Admin Tabs
ADMIN TABS
Site admins can organize and sort modules to their preference by creating up to 6 tabs with a 12-character limit. Once the tabs have been created, modules can be sorted within each tab.
This is especially helpful to Webmasters who focus on a few particular modules.
To Edit the Admin Area Tab titles:
- Click on the gear tab (the tab furthest right).
- Highlight the text (default will be Main Menu).
- Hit backspace or delete.
- Type in the correct tab title.
- Click Save.
To Add additional Admin Area tabs:
Additional tabs are available to admins with 2 or more modules.
- Click on the gear tab (the tab furthest right).
- Type the title for the additional tab.
- Click Save.
To Add Modules to Tabs:
- Click on the gear tab (the tab furthest right).
- Click on the Add Modules to Tabs link.
- Use the category drop downs to select which tab the module should be placed. NOTE: To see what links are under each Module, click on Show Links next to the Module Title.
- Use the sort column to change the order of the modules in the tab.
- Click Save.
Administrators
ADD NEW ADMINISTRATOR
Administrators contribute to the maintenance of the website. Webmasters are defined as those who have access to all areas of the site but may not be responsible for all areas.
Maintaining a site can be overwhelming. Decentralizing the maintenance is an important factor in avoiding a bottleneck of updates and keeping the site current and fresh. Webmasters can restrict an administrator down to a single page.
Adding a New Administrator:
- Enter in the First Name, Last Name, and Email Address.
- Check the box check here for default email address which automatically enters your default email address. If this isn't correct, please contact the support team.
- Password - there is an 8-character minimum required for the password.
- The Location Limit? drop down menu allows you to determine how much access this administrator will have to the website. Choose the appropriate location(s) from the pull down menu.
-
Limit More? (optional) - Multiple locations can be assigned to site admins; allowing them to manage not only Site Content/Webpages but also News, Calendar, Add/Edit Staff, Teachersites, Information Alerts and Home Page Images (if applicable) for multiple locations.
-
Use Defined Role (optional) - if you setup Admin Roles, select the appropriate role for the site admin.
-
You can copy the rights of an existing admin to the new account by selecting the checkbox. It is location specific so if you add someone to a specific location, the system will pull a list of existing admins from that particular location.
- Click on the Continue button at the bottom of the form.
- The next screen allows you to assign rights to certain areas of the site.
- Full Admin Access - Webmaster Rights - If the administrator is allowed full access to all applications of the overall site, please check the Webmaster box under Other Locations. Hit Save.
- Restricted Access - Scroll down to Administrator Rights and select the checkbox next to each category this administrator should have rights to. You can give administrators the individual right to TeacherSites, which allows them to add and maintain TeacherSites accounts based on their location.
- If the administrator has rights to any of the pages on the site, select Site Content. The next screen will ask you which pages - you can filter an admin down to a single page.
Site Content:
- If the site admin has rights to any webpages, select the Web Pages checkbox. Upon hitting Save, the system will then ask you which main areas of site content.
- If the site admin has full access to a Main section, select the Main section, then scroll down to the bottom of the page and select the Important checkbox. Hit Save.
- If the staff member does NOT have full access to the Main section, hit Save without selecting the Important checkbox.
- The next screen will then allow you to select specific pages within the Main section he/she has rights to. Select the pages.
- At the bottom of the screen, select whether they can add pages, move pages or delete pages to the section they are responsible for.
-
Page Approval System - To Setup Approval System for Administrator:
• On the Content Rights screen under Other Options to Consider, deselect the Ability To Post Content without Approval checkbox.
• Click Save.
• Under Approval Responsibility, select boxes for administrators who can give approval for this person (by default, webmasters can approve all content).
Note: Specific approvers must be setup per administrator unless a webmaster will be granting all approval.
When Administrator Edits Page:
• He/she does not see an option for page on site/off site.
• He/she can make edits to page info, images, files, and links and can only edit the images, files, and links that he/she has added. These will display as "pending approval" until fully approved.
• Upon clicking Save, the administrator can choose to send an email to a specific approver or webmaster notifying of changes.
Note: The page will display on the site in its original format until an approver or webmaster approves any changes. An administrator will only be able to delete a page if he/she created it, and has page deletion administration rights.
To Approve Changes to a Page in the Admin Area:
• Under Webpages – Site Content, a red "page needs approving" link will display.
• Click on the appropriate page and click on the blue view link.
• Top of page displays links for each type of content that needs approval - page info, image(s), file(s), or link(s).
• Page Info tab - Click blue "click to view content" link to review changes. Click Save button to approve changes OR click blue "click here to delete now" under Approval Notes section to deny changes.
• Images, Files, Links tabs - Select checkbox to approve item or select delete to deny it, then click Update button.
Note: Changes made by administrator needing approval will not display on the website until an approver accepts them.
To Approve Changes to a Page via an email link:
• Approvers will be notified via email of any updates to pages from site admins requiring approval before posting. Click on the URL to approve changes on the front end of the site.
- Simply click or copy the URL to view the proposed changes - you will have a button at the bottom of the page to approve the changes. If you need to edit or delete any of the proposed content, you will have to login to your ADMIN area to take care of the details.
- Select the checkbox(es) to confirm approval then click on the approve button at the bottom of the page for final confirmation.
- If you would like to email your approved information, please refer to the checkbox at the bottom of the page.
Calendar Approval System
To Setup Approval System for Administrator:
- On the Administrator Rights screen, select Add Event, Edit Event, and the Calendar limit Own Events (location limited, needs approval).
- Click Save.
- Under Approval Responsibility, select boxes for administrators who can give approval for this person (by default, webmasters can approve all calendar items).
Note: Specific approvers must be setup per administrator unless a webmaster will be granting all approval.
When Administrator Adds/Edits Events:
- Admins will not see an option for event on site/off site.
- Admins can make edits to the event information, images, files, and links and can only edit the images, files, and links that they have added. These will display as "pending approval" until fully approved.
- Upon clicking Save, the administrator can choose to send an email to a specific approver or webmaster notifying of changes. The system automatically sends an email to selected approver(s).
Note: The event will display on the site in its original format (if being edited) until an approver or webmaster approves any changes. An administrator will only be able to delete an event if he/she created it.
To Approve Changes to an Event in the Admin Area:
- Under Calendar System, a red "event needs approving" link will display, click on link.
- Click on the appropriate event link.
- Review changes. Change the On Web Site drop down to Yes to approve.
- Click Save.
Note: Changes made by administrator needing approval will not display on the website until an approver accepts them.
To Approve Changes to an Event via an email link:
- Approvers will be notified via email of any updates to calendar events from site admins requiring approval before posting.
- Click or copy the URL to approve changes on the front end of the site.
- Click on the Approve this Event link at the top of the page to approve the event.
- If you need to edit or delete any of the proposed information, you will have to login to your Admin area to take care of the details.
- Enter your Name and Email address.
- Click on Approve Event.
- A confirmation email will be sent to the admin needing approval.
ADMIN ROLES
When creating new administrator accounts for the website, you can setup a defined Role with specific rights then assign the admin to that particular role.
For example, a Site Admin Role may have rights to pages, news, calendar events, filing cabinet, forms and staff directory for their location.
To create an Admin Role:
- Click on Admin Roles.
- Click on Add New Role.
- Enter in the Role Name - i.e. Site Admin.
- Enter in a Role Description (optional).
- Hit Continue.
- Select the areas the Admin Role should have rights to.
- For Site Content rights, if you select the Pages link, you can select a particular location(s) pages.
- For the Options link, you will select the content rights.
- For example, if you are setting a role for a Site Admin, you will check the Site Content/Web pages checkbox but not select from the Pages area. You will select rights from the Options area. Therefore, when you add the administrator and filter them to a location, the system will give the admin rights to their location pages.
- Hit Save.
To assign an Admin Role to a site admin, click on Add Administrator, enter in name, password, email, location and select the appropriate role. Hit Continue. All the rights assigned to that particular role will be selected and can be edited if necessary.
To edit an Admin Role:
- Click on Admin Roles.
- Click on EDIT next to the role.
- There are 3 options once you edit a role:
- Update all admins assigned to that role with the changes.
- Clear all current admins with the role and reset them with the updates.
- Do nothing to the existing admins.
- Hit Save.
EDIT ADMINISTRATORS
Editing an Administrator:
- Click on Edit Administrator.
- Locate the Administrator you wish to edit. You can enter in any part of their name in the Search field.
- Click on the Edit link to the right of the their name.
- Make changes in the Administrator Info and Administrator Rights sections as needed. Note: The top of the Administrator Rights section allows you to quickly check all or clear all rights. In addition, admins associated with an Admin Role can have their rights reset to the basic rights of the current role or change the role.
- Click the Save button at the bottom of the page.
- If an admin is assigned to a role, the name of the admin role will appear in parenthesis below their name.
To Deactivate an Administrator:
- Follow the first two edit administrator steps.
- In the Administrator Info section, enter a date in the Account Expiration field.
- Click Save.
- The admin will no longer be able to login to the admin area after the expiration date, however, a history of his/her actions and access to his/her image gallery will remain accessible. We advise expiring an administrator rather than deleting.
To Delete an Administrator:
- Follow the first two edit administrator steps.
- Scroll down to the bottom of the form.
- Select the check box check here to delete this person.
- Hit Save.
Other Options:
Login As - This button allows you to login and test an administrator's rights. Use it to ensure that rights are setup properly and to help admins troubleshoot any questions or issues.
Content/Site Paragraphs - Quickly see and change which site content sections administrator has access to. Restrict admins to particular Site Paragraphs.
Login History - Click blue date link to view history of each time administrator has logged in. Date, time, and IP address all display.
Recent Logins - Click this link to see all of the latest logins, including the administrator who logged in and the date and time the login occurred.
Find User with Right - admins with a certain right can be emailed as a group. Under Edit Administrators, click on find users with certain right. Select the right(s) and hit Continue. The ability to email the group of people is an option.
Give Users Right - easily give admins a particular right. Choose the right, or rights to be added to all or selected users, then click Continue. Note: content rights can not be given to all users.
Show All Users - list view of all admin users.
Email Administrators - Use this link to send an email message to all administrators at a particular location. For example, you may wish to alert them to upcoming server maintenance periods or to any new tips you've learned about using the site. Passwords can also be emailed to them en masse.
View Admin Email History - view past email communications to admins.
Banners
ADD BANNER
The banners module allows you to post a clickable image on subpages of the site. This provides a great way to advertise an upcoming event, direct visitors to a specific page, or link to a sponsor's website.
- The Banner Name appears as an alt tag that visitors see when hovering over the image on the front of the site
- Enter in a URL for the banner to link to. Note: this can link to an internal page or an external website.
- Use the Start Date and End Date fields to determine when it will be accessible. The end date is optional.
- Use the Activate field to determine whether or not the banner is currently active.
- Select which main navigation sections the banner will display on by checking the boxes. Note: the banner system will only display on subpages of the site.
- Use the Any Comments to remember field to post internal comments about the banner (e.g. what the goal or purpose of the banner is)
- Use the browse button to upload an image for the banner. Note: If linking to an internal page, you may wish to create a graphic that says Click Here so the visitor realizes it's a clickable image.
- Click Save.
BANNER CLICKS
The Banner module can be used as a marketing tool to help encourage visitors to access certain pages of the site. The banner clicks section allows you to see how effective the banner has been.
Use the month and year drop down menus to select what time range you'd like to view clicks for.
Views - The number of times the banner was viewed
Clicks - The number of times the banner was actually clicked on
Click % - The percentage of time the banner was viewed and then clicked on
EDIT BANNER
- Click on the edit link to the left of the banner title
- Any of the fields can be adjusted as needed
- When done with edits, click Save
Note: To fully delete a banner, scroll to the bottom of the edit screen and check the red checkbox. Then click Save.
Bloggit
MAINTAIN BLOGS
The BloggIt Module improves communication and effectiveness by providing a forum for sharing ideas, activities, suggestions, and other pertinent professional topics.
To add a Blog:
- Click on Maintain Blogs.
- Click on the Add New Blog link.
- Enter in the Blog Title.
- Display Posts - select how you would prefer blog posts display: Oldest to Newest or Newest to Oldest.
- Show on Site - select Yes or No. Select Internal Only to have the Blog displayed for staff only.
- Password Protected - to password protect the Blog on the public site, enter in a password (optional). This field is limited to 20 characters.
- Enter in a description of the Blog (optional).
- Comment Options:
- Allow Comments - Select 'Yes' if you would like to allow people or students to comment on your Blog postings or 'No' if you do not.
- Automatically Authorize Comments - To automatically authorize comments, select 'Yes'. If you select 'No' to not automatically authorize comments, you would have to approve them first before they're posted.
- Show Comments - To display the posted comments, select 'Yes' or 'No' to not show comments.
- Show User Email - Select 'Yes' to display the email address of the posted comment. If you do not want email addresses displayed of those who posted a comment on the front end, then select No.
- Hit Next.
- Enter in a Posting Title. You must add at least one posting in order for people to be able to post comments to your Blog.
- Enter in the content of your first blog post.
- Hit Save.
- Images tab - to add an image to your blog, click on Maintain Blogs, then on the link under the Posts column. Click on the edit link next to the posting, then on the Images tab. Click Browse, select your image, hit Save.
- Files tab - to add up to 3 files to your Blog for reference, click on the Files tab. Click on Browse, select your file, enter in a friendly file name and hit Save.
To link to an existing Blog:
You can link to a page that displays all active blogs for your site using blog.cfm as the URL. To link to a specific blog follow the steps below.
- Click Maintain Blogs.
- Click on the title of the blog you wish to link to.
- Scroll to the bottom of the Maintain Blog page and click view page on site.
- Copy the URL from the front end of the blog page (for example: blog.cfm?blogID=12973).
Note: You can decide where you'd like the link to your blog to display on the website. For example, it can be a Quick Link on the homepage, a Home Page Banner, a GoTo subpage, a related link on a typical webpage, etc.
To edit a Blog:
To add a posting to an existing Blog:
- Click on the Add Post link when editing a Blog.
- Enter in the posting title and description.
- Hit Save.
Sorting your Blogs:
- Click on Maintain Blogs.
- Click on Sort Blogs.
- Change the Blog sort order.
- Hit Save.
To View/Authorize Comments:
- Click on Main Menu in your admin area.
- If there is a comment waiting to be authorized, there will be a blue hyperlink below Maintain Blogs.
- Click on the X comments needing authorization link.
- Click on the blue link # under the Authorize! column.
- Click on # comments link.
- Review the comment. If you are ready to approve, check the Authorized box and click Save.
- Click the edit comments link to change the comment before authorizing.
To Delete Comments in a Blog:
- Click on Maintain Blogs.
- Click on the number link under the Posts column.
- Click on the number of comments link (For example, 4 comments). **Please note: if it says 0 comments, then click on the edit link instead and make your updates.
- If the comment you wish to delete is displayed, click on the edit comments link, then Check Here to Delete This Comment. Hit OK.
- If you do not see the comment you wish to delete displayed, click on the Show All link. Click on edit comments, then Check Here to Delete This Comment. Hit OK.
Board Members
ADD BOARD MEMBER
This module displays the board members in a nice, organized format with ruled lines in between each board member. Information such as address, phone, term ends, bio can be included on each member. First & Last Name are the only required fields, the rest are optional.
Adding a Board Member:
- First & Last Name: type in the first and last name.
- Title: type in the title of the person, if applicable.
- Address line 1 and 2: type in the address.
- E-Mail: type in the email address.
- Phone: type in the phone number with area code.
- Term Ends: type in the term ending date of the Board Member.
- Picture: you may add a digital image of a Board Member. Just click the Browse button to upload the image - in jpg or gif format.
- Add Comments or Additional Information? in the text box provided if applicable.
- The # for Sorting: text box at the top of the form need only be changed if you prefer the person appear in another order other than what the Web site automatically lists them in.
- Click the Save button at the bottom of the page.
EDIT BOARD MEMBER
Editing a Board Member:
- Click on Edit Board Member.
- Locate the Board Member you wish to make changes to.
- Click on the Edit link to the left of the their name.
- Retype over any information you wish to change using the appropriate text boxes.
- If you wish to change the digital image of the Board Member, click the Browse button to the right of the Picture: text box.
- Locate the digital image of the person (.JPG or .GIF formats are best).
- Double click on the file to replace the current image with a new one.
- Click the Save button at the bottom of the page.
- To delete a Board Member, check the "check here to delete this one - then hit save" box at the bottom of the page and then hit Save.
To change the Sort Order in which the Board Members appear:
- Click on Edit Board Member.
- Enter in the correct sort number in the text field.
- Hit Sort.
Calendar
ADD EVENT
Adding a Calendar Event:
Follow the form to complete the information necessary for the calendar.
-
Click on Add Event.
-
Enter in the Event Headline.
-
Select a Specific Category from the pull down list. Internal only categories are noted in parenthesis.
-
On Website: select Yes or No. If the event is in draft mode, select No.
-
Location: check the box next to the location where the event should display (on front end of site).
-
Event Starts: enter in the date of the event.
-
Event Ends: enter the last day, only if it lasts for more than one day (optional). Once an end date is selected, three options will display:
-
Don't display event over multiple days on calendar view
-
Display event over multiple days on calendar view
-
Display event over multiple days on calendar view (EXCLUDING WEEKENDS)
-
Exact Start Time and Exact End Time: enter in the exact time of the event. These fields are required for calendar import option to visitors.
-
Event Site: select from drop down menu (optional).
-
Site Description: enter more details on where event is being held (gym, library, etc.) - (optional)
-
Attach Driving Directions? select from drop down menu (optional). This pulls from the Driving Directions module.
-
Full Event Description: additional information such as who is sponsoring the event, what people should bring, special attire, etc. can be entered (optional). The RTE toolbar allows for bold, italicized or colored text, embedded hyperlinks, or bulleted items that will appear in the calendar pop-up window.
-
Hit Save when finished.
Once you hit Save, you'll notice a tab system appear at the top of the form - allowing you to add images, files, links, recurring dates or facilities usage (if applicable).
-
Add your own Picture or Choose Icon (optional) – click on the Images tab, hit the Browse button and locate the digital image (.JPG or .GIF formats are best). Double click on the file of the image.
Attach a File (optional) – click on the Files tab, hit the Browse button and locate the file you wish to add. Type in a Friendly File Name – this overwrites the technical name with a more descriptive title. Ex. of files – permission slips, meeting agendas. Files can also be referenced from the main filing cabinet.
-
Add a Link (optional) click on the Links tab, type in the Web address in the first text box and a recognizable title in the second text box.
-
Recurring events - events can recur multiple times throughout the year. To enter the same information on multiple days, click on the Recur tab. There are two options for recurring events. Option 1 is for events that recur the same day each week. Option 2 is for events that recur on different dates. Click Save when finished.
Tip: If you do include a picture, be sure to enter a caption. For example, the image name may be bigBlueMarbleEarth.jpg but you want the text of the picture to read “The Blue Marble.” That is a friendly image name. This goes for files too!
iCal Subscribe: Once you add a calendar event, you will need to republish your iCal file so users that have subscribed to your calendar receive the update to the calendar. Please note that if you are adding multiple events, you can republish your iCal file after you have added all of your events).
Extra Module: If you also have the Facility Manager Module, you can request Facility Usage via the Calendar module.
- Click on the Facilities tab.
- Select the Facility Category from the drop down menu.
- Choose the Facility from the drop down menu.
- Enter in the Requested Times.
- Activity type - type in the type of activity.
- Setup Details - enter any special requirements that the event will need - like a specific layout of chairs or a projector system, etc. (optional)
- Group - select the appropriate group, if applicable.
- Hit Save.
The system will display any conflicts for the requested date(s) and time(s).
Upload Multiple Events via a CSV file:
- Click on Add Event.
- Click on Import events from a CSV file.
- The next couple of pages will allow you to upload your calendar events to the database in a few simple steps. While there are several data fields available to you, you do not need to use all of them. Category ID is required and Location is recommended if your site has multiple locations (see below for ID numbers). A few things to keep in mind before uploading your file:
- File format to upload MUST be .CSV
- Eliminate all commas from the file data
- To update event locations and categories:
- Replace the category with the ID value from below.
- Replace the location with the ID value from below.
- Up to 3 separate locations can be assigned to an event.
- There are 2 Time options - you can use exact start and end times (separate fields used in iCal download) or a single time range (i.e. TBD, Noon).
- When file is ready for upload, click BROWSE, select file and then click the "Step 2 of 5" button.
- Select the database fields you wish to populate with the file data. Column names that match exactly are pre-selected. Any field that is not matched up - will not be uploaded. From the drop down menu, select "TheTime" if your file contains a single time range (i.e.TBD, Noon or TBA). Hit 'Step 3 of 5' button. Note: The database field CategoryID MUST be matched to a field in the file.
- If all the data looks correct - click "Step 4 of 5" below to upload data to the database. TheID column is for internal use only. Note: Records highlighted in RED contain bad data and need to be fixed before uploading.
- Everything looks good. The system is ready to add 326 new records. Please complete (import) the process by hitting the 'Finish Upload' button below.
CALENDAR CATEGORIES
CALENDAR – calendar_events.cfm
The calendar section is organized by categories. The first step in using the online calendar tool is creating the categories under which actual events will be posted. The categories can be anything you designate – holidays, meetings, conferences, building event, etc.
The calendar of events will display with the category of the event and the event title. All other information entered with the event (images, files, links, etc.) will be available as a popup for parents, students and community members.
Creating Calendar Categories:
- Click on Calendar Categories.
-
Type in the Category in the text field. If you'd like an option for no category when adding events, enter No Category in the textbox.
-
Choose the Color for the calendar category as you'd like it to appear on the public site.
-
Internal Only - if the district has purchased the EduCenter module, select the Internal Only checkbox next to the appropriate category(ies). When adding an event, you will select the internal category for the EduCenter calendar.
-
Hit Save.
Special Note: The Sort order to the left of the category names determines the order that the categories display for the public on your District calendar.
CYCLE DAYS
What is a Cycle Day?
Some schools have a system of different schedule days during the week. For example, Monday is A day, Tuesday is B day, Wednesday is A day, etc. The Cycle Days feature was designed with this scheduling in mind.
It allows you to enter in a letter, number, or word that will appear in bold type on the monthly view of the calendar.
Cycle Days is location specific. If there are schools with different cycle days, each school can have their own set of days. On the front end calendar view, the cycle days will appear on individual school calendars, however, for the overall district calendar or customized calendar with 2 or more locations, the cycle days will not display.
The same set of cycle days can appear on all calendars if the location selected is All Locations.
How to enter Cycle Days:
- Click on the Cycle Days link under Calendar Events in your admin area.
- Select the month.
- The Location field defaults to All Locations. If you have more than one location, you can select an individual location from the drop down menu. Once you select a location other than All Locations, the 'Click to Add/Edit additional locations' link will appear to add more locations.
- If for instance the cycle days are the same at the Elementary School and Middle School but not the High School, the system will allow adding/editing of the cycle days to just these two locations.
- Type in the cycle day information.
- Hit Save.
Tip: You can make use of the Cycle Days module even if your school does not have different schedule days. Some clients use the feature to draw attention to special Assembly days or Holidays.
EDIT EVENT
Editing a Calendar Event:
On Website - Yes or No field
Events can be set to display or not display on the public website. For the events set to No, there is an option to easily view these events in a monthly calendar format and bulk edit them to public from the admin area. An example would be adding events for the next year set to No and then bulk changing them to Yes 'public' over the summer.
- Click on Edit Event then Calendar View.
- Upcoming Events Not on Site - this link will display when there are events set to No for On Website. Click on it to change events en masse to On Site.
- Calendar Internally - displays all events set to No for On Website.
- Calendar View - Edits - allows for easy edits of public events from a monthly calendar view.
- View Calendar on Website - displays the monthly view of the calendar with public events only.
Delete Event: To delete an event entry, click on the Delete tab, select the Yes radio button and hit Delete.
Cancel Event: Click on the Delete tab and select the link for canceling. Choose the OK button.
Find Event - easily find an event by clicking on Edit Event and then on the Find Event link next to Download Data. Please note: this is only available to Webmasters.
Sort Events - events in a particular day can be sorted.
- Click on Sort Events.
- Select or enter in the date to sort events.
- Hit Show Date.
- Enter in the sort number next to each event.
- Hit Save.
The events will appear in the order you selected on the front end calendar view for that particular date. Categories can be sorted via the Categories link.
iCal Subscribe: Once you add a calendar event, you will need to republish your iCal file so users that have subscribed to your calendar receive the update. Please note that if you are adding multiple events, you can republish your iCal file after you have added all of your events).
Clean up old data - Please help us keep your site and database up-to-date. This area lists old calendar events (2 years or older) that could be deleted from your database. Deleting them may help reduce the overall storage level and speed up certain result sets.
Directions
DIRECTIONS
The driving directions component is designed to provide site visitors with easy-to-access directions to all events, including sporting events at opponent venues.
Adding New Locations:
- Click on Add New Directions.
- New Site? - type in the name of the location you wish to add.
- Address - type the address of the location you wish to add.
- Phone - type in the phone number with area code of the location.
- Site Directions - type in directions to the location.
- If you have a link to a mapping Web site, it can be included in the URL Link? text field.
- To add a digital image of a map, click the Browse button to the far right of Map/Image?
- Locate the digital image of the map (.JPG or .GIF formats are best).
- Double click on the file of the image.
- Click the Save button after each addition.
Editing Existing Locations:
- Click on Edit Directions.
- Locate the site you wish to change.
- Click on the edit link to the left of the site you wish to change.
- Retype over any information that is currently included.
- If you wish to change the picture of the map, click on the Browse button to the right of the Map/Image: text box. Locate your new map image. Double click on it to replace the current image with a new one.
- Click the Save button after each change.
- Sorting - to change the sorting of the sites, enter in the appropriate number in the sort field and hit Save.
Enhanced Directions:
The Enhanced Driving Directions will allow you to display a Google map and directions on your directions.cfm webpage. They will display in conjunction with your custom driving directions and uploaded map(s). The first step is to sign up with Google as per instructions below:
https://accounts.google.com/SignUp
- Read and agree to the terms and conditions.
- Then follow the directions for Obtaining an API Key: https://developers.google.com/maps/documentation/javascript/tutorial#api_key.
- Visit the API Console
- Click on Services and activate the Google Maps API. Click on API Access and copy your API key.
- Enter in the Default City.
- Enter in the Default State.
- Enter in the Default Zip Code.
- Hit Save.
Doorways
ADD DOORWAY
A "Doorway" is a virtual directory. In many cases, pages that are created within the website have a lengthy URL - such as www.demoschools.org/athletics.cfm?subpage=104&master=4
A Doorway allows a site administrator to create an easier name by which the same pages can be accessed. For instance, in the example above that includes:
www.demoschools.org/athletics.cfm?subpage=104&master=4 - a doorway could be created to read
www.demoschools.org/teams
Adding a Doorway:
- Click on Add Doorway.
- Determine the name of the doorway. Enter the name into the Directory Desired field (no spaces).
- Enter the current, lengthy URL you wish to send your users to in the Going to what URL? field.
- Click on Add Directory.
EDIT DOORWAY
To edit a Doorway:
- Click on Edit Doorway.
- Click on the Edit button next to the doorway you'd like to change.
- Make changes to the URL.
- Click Submit.
Please note: To delete a Doorway, simply go to Edit Doorway, click on the edit button next to the Doorway you'd like to delete then click on the box stating 'check here to delete this directory'. Click Submit.
Email Center
ADD EMAIL RECORD
When visitors choose to add themselves to your email communications list, they are automatically added to the database. However, there are times when you may need to add an email address manually to the database.
To add an email record:
-
Click on Add Email Record.
-
Enter First Name, Last Name, and Email Address.
-
Enter Address and Phone information (optional)
-
Select the appropriate categories.
-
Hit Save.
To add multiple email addresses in bulk:
-
Click on the Add Multiple Email Addresses link in the right-hand corner.
-
Option 1 - add the email addresses with each one separated by a comma or line break.
-
Option 2 - Add email addresses with first and last names - each row must be separated with a return. Select Comma Delimited if your data has a comma separating email, first name and last name on each line. For example, pete@google.com, Peter, Practice. Select Tab Delimited if your data is being copied from Excel with tabs separating email, first name, and last name.
-
Click Next.
-
Select the appropriate categories.
-
Click Next.
-
If data looks good on Confirm Upload screen, click Save.
CATEGORIES
The Email Center is a communication system organized by categories and subcategories. The first step in setting up the Email Center is to create the categories.
- Click on Categories under Email Center.
- Enter the category name in the new text field.
- Enter a description (optional).
- Select either Public or Private from the drop down menu.
Please note: PUBLIC means that anyone can sign up for this list. If unchecked, it becomes a private list and will not allow people to sign up for the Email Center on the front of the website. - Click the SAVE button after each addition.
Subcategories can be added to any main Category. Subscribers can opt-in to any subcategory or for the entire main category.
To add a Subcategory:
- Click on the Categories link, then on the subcategories link below the main category.
- Enter in the subcategories and hit Save.
An existing main category can be moved to a subcategory by clicking on the move existing category as sub link (located in the add subcategory area).
Deleting a Category:
- Click on the red Delete! link to the left of the category in the Delete! column.
- Click OK to confirm deletion.
The system will display the number of email records associated with the category that will also be deleted upon confirmation. To proceed with deletion of category and all associated email records, click on the Delete button.
Please note: email records associated with more than one category will not be removed from the other assigned categories - only the category being deleted.
ID Number - Categories and subcategories are assigned an ID number. A Quick Link or goto page can be created to link directly to a specific list category or subcategory.
Under the column titled ID, click on the ID link to view the front end page. Copy the URL, for example, emailsignup.cfm?CategoryID=3 and paste it into a Quick Link field or goto page.
On the front end, visitors will be directed to the specific category with an option to view all lists.
Creating Main Categories from existing Subcategories - easily move existing subcategories (and all subscribers in the subcategory) to the Main Category level.
- Click on Categories and the subcategory you'd like to move up one level.
- Click on the link for the number on list.
- In the footer, click on the More Info link next to Change this subcategory to a main category?
- Select Make this a Main Category and hit OK.
CATEGORY OWNERS
Although a central site administrator will handle the creation of the categories for the Email Center, each category can have a designated manager to maintain the list for their group. This allows groups to control their own email lists and also to use the website to send out “email communications” to only their respective lists.
To establish Category Owners:
-
Click on Category Owners.
-
Click on the Edit link in the Owners column next to the appropriate category.
-
On the next screen, select the individuals who will manage the category. This list pulls in the Administrators that have been setup for the site.
-
If the person needs approval before sending out any communications, select the Needs Approval box.
-
Scroll down and hit Save.
-
To select the approvers, click on the edit link next to the category. Then click on the Select Approvers link under the owners name.
-
Check off the approvers. Note: admins requiring approval will not see the list of subscribers on step 4 for security reasons.
-
Hit Save.
EDIT EMAIL RECORDS
To update an email record:
- Click on Edit Email Records.
- You can either search by Last Name, Email Address, or Category list.
- Click on the email record you want to edit.
- Make the appropriate changes.
- Hit Save.
- Please note: to add additional categories to an existing account, click on edit email address.
The Edit Email Records area also allows you to view the monthly signup data by clicking on the Signup Data link. You can also download the data in a comma, delimited format by clicking on the Download Data link.
Subscribers - can edit their information and category selection on the email signup page via the existing record link. This allows subscribers to request an email from the system with a link to their original signup information. They can then edit their subscription information or unsubscribe, without needing to receive a communication from the district.
To Bulk Delete Email Records
The system allows for the bulk deletion of email records that are associated with one specific category by deleting the category itself.
- Click on the Categories link.
- Click on the red Delete! link to the left of the category.
- Click OK to confirm deletion.
- The system will display the number of email records associated with the category that will also be deleted upon confirmation.
- To proceed with deletion of category and all associated email records, click on the Delete button.
Please note: email records associated with more than one category will not be removed from the other assigned categories - only the category being deleted.
To Move an Email Category
You can move a current Email Category to a sub category.
- Click on the Edit Email link.
- Click on the main Email Category you wish the move the category to.
- Click on the Move Existing Category as Sub link.
- Click on the category you wish to make a sub category.
- The category will then be moved to be a sub category.
FROM ADDRESSES
In this area, you can control the From Email Address field, sort the addresses and add new ones. Click on From Addresses.
Under Email Defaults - Options, select Yes or No for the email address to show in the From field. Hit Save.
Re-sort the order in the Prepare Email Step 2 drop down menu by editing the sort number, hit Save when finished. Webmasters control the 4 options for no reply, info, user-self reply and own admin address. Site admins locked down to a location will only see email addresses for their particular location.
Additional Email Addresses
Add other email address options to the From Address menu by entering in the text field, select the Location and hit Save.
HISTORY
To view a history of the emails that have been sent, click on History. On this screen, you can view your personal emails as well as the date and category they were sent, the number of people each was sent to and whether or not the communication was completed. If the email had any clickable items such as links or files, you can track number of clicks in this area.
PREPARE EMAIL
There are 4 steps involved in preparing an email communication.
Step 1:
- Select the email template to use.
- Check off the category(ies) you'd like to send to. If you reach the maximum number of categories allowed, the system will prompt you with "You have reached the maximum number of categories that can be selected for this email communication. Please prepare a new email for any additional categories."
- Determine if the communication should be sent immediately or at a later date and time. Please note: the system sends to the subscribers as of the date the communication was created not actually sent.
- Hit Next.
Step 2:
- Enter in a Subject.
- Select the From Email address (these options are managed in the From Addresses area).
- Select the Importance rating (optional).
- Enter in the email message copy.
- Please note: if you paste content from Word or another software program in the email message area, click on the Remove Word Formatting button to remove any unnecessary HTML coding that may cause issues. We also recommend sending a test email to yourself before sending to the entire group.
- Add in a URL (optional).
- Hit Next.
Step 3:
- If you would like to reference a file from the Filing Cabinet, select the category the file exists in, hit Next. Select the checkbox of the file(s) to reference and hit Next.
*If you do not plan on referencing a file, simply hit Next to go to the final screen.
Step 4:
- Final confirmation - check to make sure your subject line, email message, and optional file or link attachments are correct. Click on Edit Email Message Info or Edit File References to make any updates before sending.
- To view the database you're emailing to, click on View People.
- Track Clicks - select this checkbox to enable the system to log any click from this specific email. Details will be in the email history report.
- Add additional email addresses to communication (optional).
- If all is correct, hit Send Message.
TEMPLATES
You can customize the footers for each template as well as the template name.
- Click on Templates.
- Click on the template hyperlink.
- Enter in the footer information or update the template name.
- Hit Save.
Please Note: additional templates can be created and can be category specific or even holiday or season themes. Contact support for more information.
Facilities Manager
ADD FACILITY
Once the structure for the facility category and type is setup, you'll want to add the facilities.
To Add a Facility:
- Click on Add Facility.
- Category/Location - choose a venue from the pull down menu.
- Type - choose the appropriate facility type from the drop down menu.
- Facility Name - enter the appropriate name of the setting type. For example, if the setting type chosen was a classroom, the room number of the classroom would be entered in the text box.
- Facility Description - enter an in-depth description of the Facility Name and/or provide directions as well as any limitations to it's general availability (optional).
- Facility Image - To add a picture of the facility, click on the Browse button next to the Facility Image and locate the digital image (.JPG or .GIF formats are best). Double click on the file of the image.
- Click the Save button at the bottom of the form.
ADD FACILITY USAGE
Facility usage requests can be made in the admin area, in the EduCenter or on the public site. Please inform support which areas should display the request form.
Add Facility Usage via admin area:
- In the Activity Name text box, enter the event. For example, Dance Class.
- In the Facility Category field, choose a category from the pull down menu.
- In the Choose Facility menu, choose a facility from the pull down menu.
- In the Activity Type text box, enter a description of the activity such as Practice to coincide with the Dance Class example.
- In the Group text box, choose from the pull down menu, if applicable.
- In the Activity Description text box, enter a more detailed description of the activity, if desired.
- Enter Setup Details in the text box, if desired.
- Click on the calendar icon to select the Activity Date.
- In the Starts & Ends text boxes, enter a start and end time - indicating AM or PM.
- Recurring Events:
- Option 1 - the Recurring Until text box allows an event to be displayed over a specific period of time. Enter the date of the last day of the event in the text box and then check which day(s) you would like the event to recur.
- Option 2 - if the event recurs on different days of the month or year, enter in the specific dates in the text fields or click on the calendar icon and select the date(s).
- Click Save.
EDIT FACILITY
To Edit a Facility:
- Click on Edit Facility.
- Click on the facility category.
- Click on the facility name.
- Make your edits. Facilities can be color-coded for easier viewing on the usage calendar. Click on the color box and select a color. The system will drop on the appropriate hex value.
- Facility Notification/Approval People - each facility can be assigned an approver of facility requests. Enter in the approver's email address and name in the proper fields. Select the checkbox to receive request notifications via email.
- If the facility doesn't require an approver and all requests should be automatically approved, select the 'If you would rather have all requests for this facility be automatically approved, check this box and hit SAVE below' checkbox.
- Hit Save.
You can also edit the Hours of Operation for all, one or multiple facilities in this area.
- Click on the hrs (Hours of Operation) link, enter in the open and closed dates and times, hit Save.
- To enter in district-wide facility closings or multiple facility closings, click on Edit Facility then on Maintain Facility-Wide or Category-Wide Closing Dates link.
To Delete a Facility:
- Click on Edit Facility.
- Click on the facility category.
- Click on the facility name.
- Below the Save button, select the Delete checkbox and hit Save. Please note that only Webmasters can delete facilities with past usage. This would need to be done first before deleting the actual facility.
EDIT FACILITY USAGE
Edit Facility Usage:
- Click on Facility Usage.
- Under the appropriate venue (location), choose a facility name and click on Edit Usage to make changes to any of the information previously entered.
- Click the Save button at the bottom of the page.
- You can also access the events via the Calendar View.
FACILITY CATEGORIES
The Facilities Manager module organizes every aspect of your facility rentals including prioritizing usage and creating automated responses for reminder notes, rules, and room capacity. It also has the functionality to position your school as a community resource by allowing the public to request, reserve, and pay for facility-related rentals online.
The first step is to setup the Facility Categories and Facility Types.
Facility Categories:
- Under Facilities, click on Facility Categories.
- Enter the facility category/location in the text box (i.e. High School, Middle School, Administration Building).
- Upon hitting Save, you'll see a 'link category to location' link appear next to the category. Click on this to filter admin rights by location. System will tie the category to a location. This is helpful if you need to assign admins to manage only certain locations.
- Facility Types - Enter the facility type in the text box. For example, General Meeting, Field, Gym, Cafeteria etc.
- Hit Save.
Site Paragraphs:
There are 4 site paragraphs for the Facilities Management module:
- Facility Group Registration displays on the group registration page.
- Facility Request Intro displays on the first screen for facility requests.
- Facility Review Info is the screen when staff review their usage request before clicking on Request Facility for final submission.
- Facility Successful Request is the screen that displays when a facility request was successful.
FACILITY GROUPS
Facility Groups - this area will allow you to add outside groups who request and utilize the facilities. Insurance information can be added; notifying you of expirations and denying them the ability to make requests.
To setup the Facility Groups:
- Enter in the group name in the text field and click on Next.
- Use the pull down menu to select the Status.
- Enter the Address in the text box.
- Enter a Contact Name in the text box.
- Enter a Contact Phone number in the text box (required).
- Enter a Contact Email address in the text box (required).
- Enter Insurance Info in the text box.
- Enter Insurance Expiration Date in the text box.
- Enter Comments in the text box if desired.
- Click the Save button at the bottom of the page.
To edit a Facility Group:
- Click on the edit link next to the appropriate group and make changes accordingly.
- Click on the Save button at the bottom of the page.
FACILITY REQUEST FORM
Staff can request facilities via a secure, online form by following these steps:
- Staff would login to a secure area. The URL will be provided to you by support.
- Staff would click on the Facility Request Form link.
- They can view the usage calendar or enter in the desired activity date(s), facility and times to check availability.
- If the facility is available, the system will display a status of Available. If there is a conflict, the system will display a status of NOT Available.
- If available status, staff can continue on with the form by entering in Activity Name, type, description, and setup details. The fields in bold are required. If you'd like the setup details field to be required for staff, please notify support as this is an option.
- If not available status, staff will need to go back and enter in a different date and time. They should refer to the usage calendar to see what is already booked.
- The staff requests will appear in the admin area under Facility Usage.
- Facility requests are pending until approved. Click on the hyperlink for new requests, then on the edit usage link. If approved, set status to Approved and hit Save.
Site paragraphs are available for:
- Facility Request Form Intro
- Facility Review Info - this is the form staff review before hitting submit
- Facility Successful Request - message displayed when facility request was successful
FACILITY USAGE
Facility Usage
To view a facility usage report:
- Click on Facility Usage.
- Choose a facility or location from the pull down menu.
- Enter in the specific date or date range. Select the year.
- Click Show. Each event scheduled for the facility will display under that particular location as well as the timeframe they will be using.
- By clicking on the Edit Usage link, you can view the scheduled facility usage or edit the scheduled events.
- To schedule additional usage, enter a date (mm/dd/yyyy format) in the enter new date text box, select the facility from the drop down menu and enter in the proper times.
- To override any conflicts, select the checkbox and hit Save.
- Click Save.
Feedback
FEEDBACK
The Feedback System is tied to the Contact Us area on the front end of your website. Once a site visitor has filled out the Contact Us form and hits Submit, the submission will show up in this area.
Under Contacts-Feedback in the Admin area, the system will total the number of new inquiries.
- Under Contacts - Feedback, click on Feedback.
- To view the submission in full, click on the hyperlink of the subject.
- You will then be able to view the sender's name, email address, comments, IP address and whether or not they would like a returned response.
- You have the choice of responding to the email, forwarding it, filing it away or deleting it entirely.
- When you forward the email, you have the option of changing the subject line. The default subject line is: Please Respond to This Email. To change the default, please contact support.
- The system can also email the submissions to individual email addresses. To enter in the email addresses, click on the link - Click here to maintain list of possible emails messages can be forwarded to or copied to...
- Enter in the email addresses for all locations in order for the system to work properly. Hit Save.
- The Additional Feedback Emails area will send all submissions to the email address entered in the fields. Enter in name, email address and select the Send checkbox. Hit Save.
- For site admins with rights to this module, the system will filter by location. If a location-based site admin has rights to Feedback, then they will only manage the feedbacks for their location.
Bulk change feedback statuses - to change the status of feedback items in bulk:
- Click on the Feedback link.
- Select the appropriate month(s), Year and Status.
- Hit Show.
- Scroll down to the bottom of the page.
- Click on the Change Status button.
- Select or deselect the feedbacks.
- Select the status you'd like to change the items to at the bottom of the page.
- Hit Change Status.
- Note: This is a Webmaster only feature and is only available if there are 5 or more feedbacks in the system.
Track Blocked IP Addresses - you can now track blocked IP addresses via the Feedback area. There is a 'click here' link to maintain the blocked IP list.
Download Feedback
- Click on the Download Feedback link.
- Select the fields you would like to download.
- Select the month and year
- Click on Download.
View Feedback History
- Click on the Feedback link.
- Click on the Feedback History totals link (top right corner).
- Click on the View by Month link.
GUESTBOOK ENTRIES
The Guestbook feature can be used for alumni, community members or students to post comments or questions on your website.
The Guestbook needs to be added to the site in order for people to access it. Add a goto page or Quick Link using the URL - guestbook.cfm
All postings need approval before they're viewable on the site. The admin area will display the number of postings needing approval which you can access by clicking on the link.
You also have the ability to edit any of the comments by clicking on the edit-add comment link.
If the posting is approved, simply select the On Site radio button and hit Save. It will automatically appear on the public site.
Filing Cabinet
ADD FILE
WEBSITE FILING CABINET
The Filing Cabinet is a central repository for public documents and cannot be password protected. It is organized by categories. The first step to posting documents is to create categories for the files. The categories can be anything you designate. Most file types can be uploaded to the Filing Cabinet - audio, video, document and presentation files.
Adding a File:
-
Click on Add File.
-
Under Categories in the left margin, select one or more categories the file should display under on the front end of the site.
-
To upload a file, click the Browse button and choose the file by double clicking on it.
-
Enter a Friendly File Name – this acts as a title for the document; the more descriptive the better.
-
Enter a date in the Show this File on text box when you’d like the file to appear on the website. This can be a future date and the file will not appear for visitors until that date.
-
Optional – Choose a date when the file should no longer be available on the site.
-
Optional - Enter a description for the file.
-
Click the Save button at the bottom of the page.
-
For multiple file uploads to the filing cabinet, select Upload Multiple Files and then the category the files should reside in.
Referencing a Document to a webpage:
-
Click the Files tab on a typical page.
-
Click on the Referenced link under the Files tab.
-
A list of files organized by category will be displayed.
-
Check the file(s) you would like to include on your page.
-
Click Save.
Important Note: Referencing files from the Filing Cabinet is a TIMESAVER!! If a file is changed in the Filing Cabinet, the newest version will be reflected on all pages that reference that file.
ADD FILE CATEGORIES
Adding File Categories within the File Cabinet:
- Click on Add File Categories.
- Type in a File Category in the first text box provided.
- Files Posted - if your organization purchased the Intranet module, select Public View or Internal Only from the drop down menu.
- Sub Categories - Type in a subcategory for each category – at least one subcategory is required. For instance, if the category is Board of Education, a subcategory could be Minutes.
- Click the Save button after each category/subcategory has been added.
- Upon hitting Save, another level of sub sub categories can be added by clicking on the Sub Categories link.
Please note: Webmasters have the ability to mass-assign sub categories to all or specific main categories via the Edit File Categories link. For example, quickly add a "Media Center Files" sub category to each main school category in the filing cabinet.
EDIT FILE
Editing a File in the Filing Cabinet:
- Click on Edit File.
- Click on the subcategory link or the sub sub category link that your file is located under.
- Click on the File Name you wish to edit.
- Possible changes could be rechecking a category, selecting new dates, or updating the title/description.
- If a new file needs to be added to replace the current file, click the Browse button. Locate the new file you wish to add. Double click on it to replace the current file with a new version.
- If any changes are made, remember to click on the Save button at the bottom of the form.
- If the file is referenced on any Webpages or News items, the page name(s) and news story title(s) will display below the save button.
- To update the friendly file names en masse, click on the update friendly file names or expire dates link. Edit the text fields and hit Save.
Sorting Files:
- Files can easily be sorted by newest to oldest or alphabetically with the click of a link.
- Under Edit File, click on a category of files and scroll to the bottom of the listing.
- The Quick Sort Options are A-Z/Z-A or New to Old/Old to New.
Deleting a File:
- Follow the steps above for editing a file.
- Click on the Prepare to Delete link.
- Select the checkbox next to the file you want to delete or click on the Check All to delete all files in the category.
- Hit Delete.
Special Note: When a change is made to a Filing Cabinet file that is referenced on other areas of the site, the changes are immediately reflected on all areas referencing the file.
Find File - Webmasters can search for files in the filing cabinet by name. Click on 'Edit File' in the admin area and then click on the Looking for File link in the upper right corner of the page. Enter in any part of the file name and hit Find.
Move Files to Another Category
Groups of files can be moved to another category(ies). Under Edit File, click on the subcategory, then on prepare to MOVE. Select the files to move and the new category(ies). Hit Move.
File Diagnostics (only sites older than October 2009 will see this area)
Prior to October 2009, the Filing Cabinet allowed overwriting of file names with the same name. This caused issues since many people could use the same file names for different files (example: JuneNewsletter.pdf). Any files that were overwritten will display when the Run Check is clicked. To delete the overwritten files, scroll to the bottom of the page and select the Check All link and then click Delete Records.
Orphaned Files
Click on Run File Check to display any files that are no longer in the Filing Cabinet and not being used on the front end of the site. These files can be deleted by clicking on the Check All link at the bottom of the page and then clicking on Delete Files.
EDIT FILE CATEGORIES
Editing File Categories:
- Click on Edit File Categories.
- Select the file category you wish to change.
- Make your updates.
- Hit Save.
Sorting File Categories:
-
Click on Edit File Categories.
-
Enter the order you wish the categories to display to the left of the category name.
-
Click the Save button after each/all changes are made.
Category ID:
Each category and subcategory is assigned an ID number so you can create a goto page or Quick Link directly to a particular category.
Deleting File Categories:
- Click on Edit File Categories.
- Select the file category you wish to delete.
- Select the checkbox below the Save button - To completely delete this category and subcategories - check this box, then SAVE above.
- Hit Save.
- Please note: you cannot delete a file category that has files attached to it. You must first delete the files via the Edit File area then delete the file category.
Form Creator
ADD FORM
The Form Creator tool allows easy creation of an online form, including the name of the form, form purpose/description as well as options to password-protect the access or schedule the form to appear/disappear from the site. Forms can be created with an unlimited number of questions and each question has the following options:
-
Required field/non-required field
-
Option for short, medium or long answer
-
Option for true/false
-
Option for multiple choice
-
Option for file upload
-
Option for Information only
-
Option for email address
-
Option for date format (mm/dd/yyyy)
Once the questions in the form are created, the form URL is generated and can be easily linked to any area of the site for submissions to begin. Visitors to the site can submit their responses and responses are tracked in the secure admin area of the website including the computer ID and IP address of the respondent. Visitors can also select to have their completed submission emailed to themselves. Once they have completed the form, a link will display for Email Info? and they can enter in their email address.
When choosing an answer type, the "Short Answer" type will provide the visitor with a small text box limiting them to 50 character (of type), a medium answer will allow for 255 characters, and a long answer will provide a box for a free text area (no limit). Choosing "Information Only" will provide the visitor with information or instructions regarding the questions. File Upload allows the visitor to upload a file.
To Add a Form:
- Click on Add Form.
- Enter in the Form Name.
- Enter the form information or a password (optional).
- Enter an On Site date. Off Site date and form password are optional.
- Hit Continue.
- Upon hitting Continue, the next screen allows you to enter in your questions. Type in your question in the text field, decide if it should be required and select your Answer type from the drop down menu. Hit Save.
- You'll notice tabs at the top of the form that allow you to Add Questions, Edit Q, Sort Q, Limit submissions or Delete the form entirely.
- Main Info tab includes:
- Your form URL which you can link to any page or Quick Link on the site.
- On Secure Server – Yes or No. Select Yes if you’d like the data secure in the transfer once one hits the Submit button. Please note that the secure form doesn’t display your template.
- Email Submissions (optional) - form submissions can be emailed to anyone via the Email Submissions to field. Multiple email addresses (up to eight email addresses) can be added by entering commas between each address. Please note that the submitted information will always be saved in the admin area for review. If emailing form submissions, you can also select to have the top-form info and the bottom-form info emailed above and below the answers to help identify the form or form contents being sent.
- Top of Form, Bottom of Form, After Form information – you have the ability to enter in content to the top and bottom of the form as well as add copy after one hits Submit.
- Limits - you can limit the number of submissions allowed to the form. Click on the Limits tab, type in the maximum number and hit Save. Once the maximum number is reached, further submissions will not be accepted and a message appears on the front end saying the form is no longer accepting submissions.
- Advanced Feature - gives you the ability to add appointment scheduling to any form.
When you click on the Limits tab, you'll see the Advanced Feature link. Click on the click here link to take you to the next screen where you’ll enter in dates. Please enter two LIMIT dates.
-
- On Site/Off Site – The On Site field is the date the overall form is available on the front end. The end date is going to be your "Off Site" date – when the form will NOT display on the site.
- Start Accepting/End Accepting - The first date field should be the start of accepting submissions, and the end date should be the last date submissions are allowed. The start date may be quite different than your current "On Site" date. Based upon your entry here, the form will build upon your dates - allowing you to easily enter limits.
- Select the appropriate days of the week for the date range. Hit Next.
- Enter in the maximum number of submissions and the label for each one. Automatic time intervals for two hours, one hour, 30 minutes, and 15 minutes can easily be added by clicking on the links at the bottom of the page. Hit Save.
- To view your form, click on the Main Info. A link to your form will appear below the Form Information bar.
When you duplicate a form, the dates and times of the appt. scheduling can be carried over to the new form if the dates are in the future. There is a checkbox to select to include dates when duplicating a form.
Note: See Edit Form section for specific instructions on copying existing limits from one form to a new form.
- Approvers - The Approvers tab allows you to setup an approval system for form submissions. When a form submission comes through, the approver(s) will receive an email indicating there is a form submission needing approval.
Add Default Forms
A bank of common forms is available for you to choose, personalize and add to your site.
- Click on Add Form.
- Click on the Add Default Forms link.
- Simply click on a Form Name and the system will add the form and all its questions to your site. Once you click on the form hyperlink, you will be taken to the edit screen to personalize and update the form, if necessary.
E-commerce thru the Form Creator
If you have purchased the LivePay module, you can also use the Form Creator to accept online payments.
- When adding a new form, a new tab will appear titled Payment.
- If you'd like to accept credit card payments via the form, select Yes for Accept Credit Cards.
- In the Charge Amount field, you can enter in a single overall amount if you want the person to be charged when submitting the form.
- If you'd like a particular question to be a part of the charge, select the checkbox and hit Save. Please note that individual questions with payment must be Multiple Choice and the answer fields need to begin with a dollar sign. For example, $10 for Program A.
The questions being asked must be set up properly in order for them to be part of a total - they must be a MULTIPLE CHOICE (user selects one answer ony) and the question Must be Required. Also make sure you enter a dollar amount as the choices (with or without a dollar sign) at the beginning of the answer choice.
CATEGORIES
Adding a Form Category
- Click on Categories under Form Creator.
- Enter the category name in the text box.
- The description field is optional.
- Click Save.
Linking to a Form Category
Follow these instructions if you'd like to link a page that displays a specific category of forms (e.g. only Technology forms).
- First go through the steps to add your categories.
- Click on the Categories link.
- Click on the blue ID link to the left of the category you wish to link to.
- Copy the end portion of the URL from the front end of the site. This will be your link to use.
(e.g. forms.cfm?CategoryID=4)
COMMONLY ASKED QUESTIONS
Q: How can I allow other administrators to access a form I have created?
A: There are 3 options to giving other administrators access to form data.
Option 1: Grant access to a particular form. You will want to go into Form Creator, Edit Form. You will see below the name of the form is your name and next to that you have three choices: add others, duplicate, and test. Select add others and you will have the option to add three other administrators to a specific form. Hit Save.
Option 2: Location-based rights. If you'd like a site admin restricted to a particular location to have access to all forms in that location, their rights should be set to All Forms (location limited) via Edit Administrators.
Option 3: Forms Master. If you'd like a site admin to have access to ALL forms in the Form Creator, their rights should be set to All Forms (no restrictions) via Edit Administrators.
Q: Why aren't other administrators seeing the forms I setup?
A: If the creator of the form would like another administrator to be able to edit and view their form, they would need to add them as an owner under the 'add others' link. See above for steps to add administrators. You can also grant more form rights via the options above.
Q: When a submitter clicks on the View Submission link to review their details, why are they getting the following message - Sorry, this URL is no longer valid
A: Once 5 minutes has elapsed, the message will appear due to security measures. The View Submission link will display the details within the 5 minute timeframe.
EDIT FORM
In this area, you can:
- Edit the form.
- View the total number of submissions each form has received.
- Duplicate a form.
- Test a form.
- Add other admins to a form.
- Capture a form's specific ID number.
- Sort forms.
- Edit form questions including Multiple Choice; adding up to 50 fields.
To Edit a Form:
- Click on Edit Form.
- Click on the name of the form you'd like to edit.
- To edit questions, click on the Edit Q tab. Click on the Edit link next to the question. For Multiple Choice answer types, you can add up to 50 answer choices.
- To add questions, click on the Add Questions tab.
- Hit Save.
View Submissions:
- Click on the hyperlink under the Sub. column. The system will take you to the individual results.
- The Form Submissions area will give you access to group aggregates.
To Duplicate a Form:
- Click on the Duplicate link.
- Enter in the New Form Name. It's recommended to rename the form.
- Select or deselect any of the questions from being copied over (at least one question must be selected in order for the duplication to continue). This duplication will make an entirely new form which is fully editable and will be ready to take submissions.
To Duplicate Existing Limits from one Form to Another:
- Under Edit Form, click Duplicate below the old form.
- Click to Edit the new form and select the Limits tab.
- Use the Edit existing records here link and select the date(s) with the limits you wish to copy.
- Scroll to the bottom of the screen and select change this date.
- Enter the new date and select Save. This will setup all of your previous limits to display for the new date(s).
To Test a Form:
To test the form without adding results to the submissions, click on the Test link.
Form Ownership:
Each form can have up to four 'managers' (including the original creator) who can view submissions or edit the form. When you click on the hyperlink to 'add others', you can also select three more site admins.
Form ID Numbers:
Each form has a unique ID number; giving you the ability to create a goto page, Quick Link or embedded link on a page.
- Click on the form name hyperlink.
- Below the Form Information, there is a URL. Copy the URL and paste into a goto page or Quick Link.
Sort Forms:
Forms can now be sorted so that the order in the admin area is reflected on the front of the site.
- Click on Edit Form
- Click on the Sort Forms link in the lower right corner of the page.
- Enter in the sort order.
- Select the appropriate category, if applicable.
- Hit Save.
FORM SUBMISSIONS
To view the individual results of a form:
- Click on Form Submissions.
- Click on the View link. The option to Print All submissions is available on this screen as well as the ability to change the status en masse.
- Each submission is listed with date and time details.
- Click on the View link next to the submission of interest.
- This area will list the answers to each question as well as the computer IP address.
- You can print the submission by clicking on the Print Submission link.
- You can mark the submission as Keep as New or select Already Seen by clicking on the drop down menu. There is also an area to add a new status and enter internal comments.
- Hit Save.
- If there is a typo or inappropriate content added to the form, you can edit the form submissions by clicking on the Edit these answers link.
- To only see submissions from a certain date, click on the Restrict your view by Date? or Restrict by Date Range?
- If you select Restrict you view by Date?, select Greater than or Equal or Less than or Equal from the drop down and enter in date you would to restrict by.
- If you select Restrict by Date Range?, enter the from date and end date.
- Click on Display.
To view the group aggregates:
- From the Form Submissions screen, click on Totals.
- Choose the questions you want on the report. The report will aggregate the submissions to show the number of people with the same answers. By default, questions that ask for "free form text" are not selected below as they are not easily aggregated (although you can select them).
- To only see submissions from a certain date, click on the Restrict your view by Date? or Restrict by Date Range?
- If you select Restrict you view by Date?, select Greater than or Equal or Less than or Equal from the drop down and enter in date you would to restrict by.
- If you select Restrict by Date Range?, enter the from date and end date.
- To view graphs with your data, select the checkbox for 'Check this box to display Graphs with your data (where applicable)'.
- Hit Display.
To Download the submission data:
- Click on Form Submissions.
- Click on the Download link.
- Select the Questions (Answers) to download.
- To only see submissions from a certain date, click on the Restrict your view by Date? or Restrict by Date Range?
- If you select Restrict you view by Date?, select Greater than or Equal or Less than or Equal from the drop down and enter in date you would to restrict by.
- If you select Restrict by Date Range?, enter the from date and end date.
- Select Show on Screen, if desired.
- Select Include Submission Number with Download, optional.
- Hit Download.
- Click the preferred report format button - PDF or Excel. You can also highlight the text and then copy and paste the data into the application of your choice.
Mass deletion of submissions can be deleted from a form without deleting the entire form. To delete submissions, click on Edit Form, select the appropriate form, and click on the Delete tab. When you click on the Delete tab, there are two options:
1. Delete All Submissions Only - Leave form questions intact
2. Delete All Submissions and Entire Form
Select the option 1 radio button, enter in the security code and click on Delete.
Help Desk (Tech Help)
CATEGORIES
To setup the Tech Help categories and subcategories:
- Click on Categories.
- Click on Add Category.
- Enter in the category title.
- Enter in a description (optional).
- Type in at least one subcategory.
- Hit Enter Info.
To edit a category or subcategory:
- Click on Categories.
- Click on the Category.
- Make your edits - to resort the order of the sub cats, type in the sort #.
- Hit Save.
To delete a category and its subcategories:
- Follow the steps for editing a category.
- Select the checkbox at the end of the form 'To delete category and subcat...'
- Hit Save.
CREATE TECH HELP
To manually enter in a Tech Help Request:
- Click on Create Tech Help.
- Problem From: Choose a Staff Person.
- Location - Select a location and room number.
- Current Status - Determine the status.
- Assign a technician.
- Enter in an Asset Tag # or Equipment # (optional).
- Select the Activation Date.
- Enter in a due date (optional).
- Under Details, choose a category and subcategory (these are setup under Categories).
- Enter in the tech problem description.
- Enter in internal comments that are only seen by other Tech Help staff (optional).
- Hit Save.
Please note: More activation dates and recurring dates can be added on the bottom of the form.
Once the request has been added, the following features are available:
- Setting a priority to the tech request.
- Emailing the technician of the request.
- Enter in comments for the staff member to read.
- Hours tab - enter in the technician hours.
- Billing tab - enter in billing details, budget code and amount.
- Worksheet tab - printable worksheet to handout to technicians.
- Review tab - review the tech request details and print if necessary.
- Delete - delete the tech request. This is not recoverable if deleted.
PROBLEMS
The Help Desk Module relieves maintenance and technical staff from paperwork, freeing up their time to address requests.
The Tech Help Problems area allows you to view and edit any open, denied, in progress, completed, hold or future order.
Search for an order:
You can search for an order by status, location, technician, month and year. Select from the drop downs and hit Show.
Note: Open records ignore year criteria. An advanced search feature is also available by clicking the Advanced Search link for more options.
Print multiple orders:
- Select the status, location, technician, month and year.
- Hit Show.
- Select the checkbox of the orders you'd like to print.
- Hit the Print button under Print Tech Help Requests.
Change Status:
You can change the status of orders all at one time.
- Select the status, location, technician, month and year.
- Hit Show.
- Select the checkbox of the orders to change.
- Choose the New Status under the Change Tech Help Requests area.
- Hit Change Status.
- Please note: the staff member will be notified via email when the status has been changed on the ticket.
Assign Tech Help Requests to Technicians en masse:
You can assign multiple orders to a technician.
- Select the status, location, technician, month and year.
- Hit Show.
- Select the checkbox of the orders, choose the technician under the Assign Tech Help Requests area.
- Select yes or no to email the technician. If you select Yes to email the technician, there will be a link in the email that takes the technician to the module to address the issue or respond.
- Enter in any Internal Comments the technician may need to be aware of. Please note that if you are assigning multiple problems/requests to a technician at once, any Internal Comments you enter will be added to ALL requests that are assigned.
- Update the status.
- Hit Assign.
Edit an order:
To view or edit an individual order, click on the details link. In this area, you can update the status, assign a priority level and technician as well as update the category, and attach up to 3 files and/or links. Comments for staff view or internal only can be added here also. Hit Save when finished.
Email Technicians:
You can select to email technicians on a work order as well as other people. Click on the 'click here to send additional emails link under Lead Technician in a work order. Multiple requests can be assigned to a technician and an email can be sent to the technician about the multiple requests.
Internal comments box - Given the Problems page has the ability to assign several requests at once, any comments entered in the internal comments box will be added to ALL requests that are assigned (as opposed to the internal box on the request details page).
To add hours to the order, click on the Hours tab. Enter in the time and whether it's regular or overtime. Hit Save.
To print the individual order, click on the Review or Worksheet tab.
Billing tab - You can add up to 4 descriptions, budget codes and amounts at a time. A new report has also been created called Billing by Location.
To delete an order, click on the Delete tab.
REPORTS
Available reports:
- Billing By Location Report - Amount Billed By Location
- Hours By Category Report - Hours Reported By Category
- Hours By Location Report - Hours Reported by Location
- Hours By Technician Report - Hours Reported By Technician
- Status Report - List of requests, by status. Displays ticket close date for the completed status. Sort by technician is an option.
If you do not see a report that meets your needs, please contact support.
ROOMS
To add Rooms to a location:
- Click on Rooms.
- Click on the appropriate location link.
- Enter in the Room number or description (i.e. cafeteria, gym).
- Hit Save.
These will appear in a drop down menu on the Tech Help form for staff.
Rooms can be set to inactive status which will prevent reservations. This is helpful if the room is under construction or temporarily unavailable.
To set the inactive status:
- Click on a particular room to edit
- Select the Not Shown checkbox
- Hit Save.
STAFF PASSWORDS
Assigning Staff Member Passwords:
- Under Staff Members, click on Staff Passwords.
- Search for the staff member you want to give a password to either by part of a name or password.
- Next to the staff member name, enter in the Password.
- When you give them a new password, click on the checkbox next to their email address to notify them of the change.
- Hit Save.
Please Note: These passwords may be used for various applications (including TeacherSites, EduCenter (Intranet), Professional Development, Help Desk) - please do not change unless you notify the staff member.
STAFF TECHNICIANS
When setting up the Help Desk (Tech Help) system, you'll want to first indicate the technicians. The list pulls from the Staff Directory, therefore, if you do not see a name, you must first add them to the Staff Directory module.
- Click on Staff Technicians.
- Select the technicians from the list by clicking the checkbox.
- Scroll down to the end of the form and hit Save.
VEHICLES
To setup vehicle usage for tech help problems:
- Click on Vehicles.
- Enter in the vehicle name or type.
- Select the status of the vehicle.
- Hit Save.
Help Desk (Work Order)
CATEGORIES
To setup the Work Order categories and subcategories:
- Click on the Add Category link.
- Enter in the category title.
- Enter in a description (optional).
- Type in at least one subcategory.
- Hit Enter Info.
To edit a category or subcategory:
- Click on Categories.
- Click on the category hyperlink.
- Make your edits - to resort the order of the sub cats, type in the sort #
- Hit Save.
To delete a category and its subs:
- Follow the steps for editing a category.
- Select the checkbox at the end of the form 'To delete category and subcat...'
- Hit Save.
CREATE WORK ORDER
To manually enter in a Work Order Request:
- Click on Create Work Order.
- Problem From: Choose a Staff Person.
- Location - Select a location and room number.
- Current Status - Determine the status.
- Assign maintenance staff.
- Enter in an Asset Tag # or Equipment # (optional).
- Select the Activation Date.
- Enter in a due date (optional).
- Under Details, choose a category and subcategory (these are setup under Categories).
- Enter in the work order problem description.
- Enter in internal comments that are only seen by other Work Order staff (optional).
- Hit Save.
Please note: More activation dates and recurring dates can be added on the bottom of the form.
Once the request has been added, the following features are available:
- Setting a priority to the tech request.
- Emailing the technician of the request.
- Enter in comments for the staff member to read.
- Hours tab - enter in the technician hours.
- Billing tab - enter in billing details, budget code and amount.
- Worksheet tab - printable worksheet to handout to technicians.
- Review tab - review the tech request details and print if necessary.
- Delete - delete the tech request. This is not recoverable if deleted.
ISSUES
The Issues area allows you to view and edit any open, denied, in progress, completed, hold or future order.
Search for an order:
You can search for an order by status, location, maintenance staff, month and year. Select from the drop downs and hit Show. An advanced search feature is also available by clicking the Advanced Search link for more options.
Note: Open records ignore year criteria.
Print multiple work order requests:
- Select the status, location, maintenance staff, month and year.
- Hit Show.
- Select the checkbox of the orders you'd like to print.
- Hit the Print button under Print Work Order Requests.
Change Status:
You can change the status of orders all at one time.
- Select the status, location, maintenance staff, month and year.
- Hit Show.
- Select the checkbox of the orders to change.
- Choose the New Status under the Change Work Order Requests area.
- Hit Change Status.
Assign Work Order Requests to Maintenance Staff en masse:
You can assign multiple orders to maintenance staff.
- Select the status, location, maintenance staff, month and year.
- Hit Show.
- Select the checkbox of the orders, choose the technician under the Assign Work Order Requests area.
- Select yes or no to email the technician.
- Update the status.
- Hit Assign.
Edit an order:
To view or edit an individual order, click on the details link. In this area, you can update the status, assign a priority level and technician as well as update the category. Comments for staff view or internal only can be added here also. Hit Save when finished.
Email Maintenance Staff
You can select to email maintenance staff on a work order as well as other people. Click on the 'click here to send additional emails link under Lead Technician in a work order. Multiple requests can be assigned to a technician and an email can be sent to the technician about the multiple requests.
Hours tab - to add hours to the order, click on the Hours tab. Enter in the time and whether it's regular or overtime. Hit Save.
Vehicles tab - select the vehicle, enter in the miles driven and date. Hit Save.
Billing tab - You can add up to 4 descriptions, budget codes and amounts at a time. A new report has also been created called Billing by Location.
Worksheet/Review tab - to print the individual order, click on the Review or Worksheet tab.
To delete an order, click on the Delete tab.
MAINTENANCE STAFF
When setting up the Work Order system, you'll want to first indicate the maintenance staff. The list pulls from the Staff Directory, therefore, if you do not see a name, you must first add them to the Staff Directory module via Add Staff.
- Select the maintenance staff from the list by selecting the checkbox next to their name.
- Scroll down to the end of the form and hit Save.
REPORTS
Available reports:
- Billing By Location Report - Amount Billed By Location
- Hours By Category Report - Hours Reported By Category
- Hours By Location Report - Hours Reported by Location
- Hours By Technician Report - Hours Reported By Technician
- Status Report - List of requests, by status
- Vehicle Mileage Report - Miles Driven per Vehicle
If you do not see a report that meets your needs, please contact support.
ROOMS
Adding Rooms
- If you would like to assign Rooms to each location, click on the appropriate location link.
- Enter in the Room number or description (i.e. cafeteria, gym) and hit Save. These will appear in a drop down menu on the Work Order form for staff.
Rooms can be set to inactive status which will prevent reservations. This is helpful if the room is under construction or temporarily unavailable.
To set the inactive status:
- Click on a particular room to edit
- Select the Not Shown checkbox
- Hit Save
VEHICLES
To setup the vehicles used for the work orders:
- Click on Vehicles.
- Enter in the vehicle name or type in the text field.
- Select the status of the vehicle.
- Hit Save.
Home Page Banners
HOME PAGE BANNERS
HOME PAGE BANNERS
The home page banner module allows you to put a graphic on your home page and link it to a URL. It is a nice solution for placing banners to social networking sites, ENews sign up, Kindergarten registrations, etc.
The placement of the banners depends on your design template. A bank of default graphics is available for you use or you can upload your own custom graphic.
Add a home page banner:
- Click on the Home Page Banners link in the admin area.
- Title - Enter in a Title for the home page banner (optional). This will not display on the front end but will help in organizing/editing the banner in the admin area.
- Link to URL - Enter in a URL for the banner to link to. Note: this can link to an internal page or an external website.
- Image - Choose from one of the default banner choices by clicking on 'Use this link to add a Default Banner' link or upload your own image by clicking the Browse button. Please note the recommended sizing listed above the field.
- Start/Stop Showing - Use the Start Showing and Stop Showing fields to determine when it will be accessible. The Stop Showing field is optional.
- Page Location - select the column the banner should display in (only available for certain template designs).
- Click Save.
- Banner Locations - upon hitting save, you can select which location(s) the home page banner applies to, if applicable.
- Hit Save.
Edit a home page banner:
- Click on the Home Page Banners link in the admin area.
- Click on the link - edit existing.
- Select the edit link under the banner you would like to edit.
- Make your edits.
- Hit Save.
To sort home page banners:
- Click on the Home Page Banners link.
- Select the sort existing link.
- In the sort column, enter the number of the order you wish the home page banners to display. Entering in 0 for all will sort alphabetically. Integers can be entered such as 1.1 or 3.1.
- Hit Sort when finished.
To delete a home page banner:
- Click on the Home Page Banners link in the admin area.
- Click on the link - edit existing.
- Select the edit link under the banner you would like to delete.
- Select the checkbox next to Delete Banner.
- Hit Delete.
- Please note: deleted banners cannot be recovered.
Livepay
CATEGORIES
All LivePay products can be organized by category. This makes it easier for visitors to find a specific item to purchase.
To Setup Categories:
- Click Categories under the Products module.
- Type the category in the textbox (Examples include: Clothing, Accessories, Tickets).
- Click Save.
- Use the description/password/image link to add information about the category, password protect it from public viewing, or upload a product image that visitors will see on the front end of the site.
- Click on the blue link under Sub Cats to further organize into sub-categories.
- The Sort field allows you to change the order that Categories appear in on the front end of the site.
PRODUCT DEFAULTS
The Product Defaults section allows you to adjust many settings for the LivePay module.
Setup Options tab
- Select between No Shipping and Handling, dollar amount Per Product, or dollar amount Per Order. You can also use the Free Shipping Option for products over a specific dollar amount.
- Select between No tax and percentage amount Per Order.
- Enable Product Quantity Check, select Yes if you want products to only show on the site if there are more than 0 in quantity available. You can set the quantity available for each product.
- Display Quantity Left, select Yes if you want the user to see the number of products left.
- Limit Order to Quantity Left, select Yes if you want visitors to only be able to order up to the amount of the product left.
- Use the checkboxes to determine which credit card(s) you accept.
- Click Save.
Order Info tab
- Use the FROM Email Address field to provide a 'from address' that visitors will see in the email confirmation. This address will also be copied in on the notification email.
- Enter an additional email address that should be blind copied in on all emails.
- Use the Order Question Options field to include up to three additional questions that visitors will need to complete after the standard contact information questions.
Price Changes tab
This option allows you to provide a discount or price increase for all products in a specific category. For example, you may wish to offer a 10% discount on all clothing products during a special time of year.
- Select All Categories or one specific category.
- Use the Add or Subtract drop-down to determine the type of price change.
- Use the Percentage drop-down to select the necessary amount of price change.
Discount Codes tab
This option allows you to setup promotional codes that specific visitors can use to receive a discount at checkout.
- Use the textbox to enter in the promotional code. For example: MISC135
- Use the drop-down field to select the percentage off.
- The discount will be applied to the full offer at the time of checkout.
PRODUCT ORDERS
The Product Orders section keeps an archive of all items that have been purchased.
To View Order Information:
- Click Product Orders.
- The default view displays New orders.
- Use the Month, Year, and Status drop-down menus to search through all orders.
- Click Show to display results.
- Use the blue download data link to export information to Excel.
- Click on the blue order number link to view details for a specific order.
- Use the Status drop-down to change the status of the order.
- Use the textbox to enter in Internal Order Comments that can only be seen in the admin area.
- Use the blue print order link to print order details.
To Mass Change the Status of Orders:
- Click Product Orders.
- Use the Status drop-down menu to select which status you would like to change.
- Scroll to the bottom of the page and click the link for Change All Pending/New Statuses.
- Select the status to change to.
- Click on Change.
PRODUCTS - ADD/EDIT
The Products - Add/Edit menu allows you to post items that are available for purchase.
To Add a New Product
- Click Products - Add/Edit.
- Enter Product Title.
- Enter an optional Item # or SKU.
- Enter an optional Product Description.
- The Price for 1 is required.
- Use the Price for > 1 field if there is a discount when a certain quantity is purchased.
- If the quantity is limited, use the Quantity Avail field to enter the limit.
- Enter an optional Cost of Product to note the internal cost for reporting purposes.
- A product image can be uploaded using the Browse button.
- Enter an optional Image Caption.
- Email Orders To - enter in one or multiple email addresses for order notification.
- Click Continue.
- Check off the category the product should be associated with.
- Click Save.
To Find/Edit Existing Product
- Click Products - Add/Edit.
- Click Find/Edit Product.
- Use search fields or click Find to view all products.
- Click on the blue link to the product you wish to view or edit.
Show All Products provides a quick way to view all products in the system.
Download Products
- Click Products - Add/Edit.
- Click Download Products.
- Use the Specific Category drop-down menu to select All Products or one category.
- Click Download button.
- Copy and paste the information in the textbox into a new excel spreadsheet.
Menus
ADD MENU
Districts and schools can display menus in a convenient, user-friendly calendar format. Any type of menu can be created - breakfast, lunch or snack - for each building location. The menus display in a similar format as the district/school calendar.
Add a Menu:
- Click on Add Menu.
- Select the month, year and category.
- Hit Show Month.
- Enter in the daily menu for each day of the month in the left-hand text boxes.
- The right-hand text boxes are for additional menu information which will appear in a separate pop-up window on the front end.
- Check the spell check box (optional).
- At the bottom of the form, you have the ability to enter in information that will appear as a footer for that particular menu.
- Hit Save.
No Weekends:
Saturdays and Sundays can be hidden from view on the front-end calendar.
- Click on Add Menu and then Weekend Option.
- Select No Weekends and hit Save.
- Please note: this feature is available only to Webmasters.
Daily Defaults:
Daily Defaults will allow you to set daily default menu items that can be copied to each month's lunch menu.
- Click on Add Menu.
- Select Maintain Daily Defaults.
- Select the category to add defaults to. This will only display if you have more than one menu category.
- Type in the defaults for each day.
- Hit Save.
- For each month, you will need to select Copy My Daily Defaults in order to add the default information to the menu.
Copy Menu:
Allows you to copy one month's menu to another month.
- Click on Add Menu.
- Click on Copy Menu.
- Select the month to copy from.
- Select the month to copy to.
- Select the category to copy.
- Hit Next.
- Select Copy Data Now.
- The copied menu can be edited if necessary.
EDIT MENUS
To edit a Menu:
- Click on Add Menu.
- Select the month, year and category.
- Click Show Month.
- Make the desired edits.
- Click Save.
To delete a Menu:
- Follow the steps above to edit the menu.
- Scroll down to the end of the menu.
- Click on Delete This Menu?
- Confirm deletion.
- Hit OK.
MENU CATEGORIES
Parents, students and staff all want to know what's for lunch each day in the school cafeteria. Therefore, one of the most heavily trafficked areas is the Lunch Menu.
Our Lunch Menu module allows Food Service to easily set up breakfast or lunch menus for each building. The menus are organized by categories. You can create as many categories as needed.
- Under School Lunch - Menus, click on Menu Categories.
- Type in the new category in the text box.
- Hit Save.
- To delete an existing category, select the Check to Delete! text box next to an existing category. Please note: if a category is tied to a menu, the menu needs to be deleted first then the category.
- Click the Save.
Link to specific menus
Goto pages can be created to specific menus by referencing the ID number. When you click on Menu Categories, the ID number displays to the left of the category.
To reference a particular menu category, create a goto page with a URL of lunch_menus.cfm?mycat=1 - the ID number will be the mycat=number.
For example, if your category is ID 4, then the URL would be lunch_menus.cfm?mycat=4
Message Boards
ADD MESSAGE BOARD
The incorporation of an online discussion board serves as the ideal method to encourage and facilitate communication and resource sharing.
Questions, answers and resource materials can be shared on a variety of subjects. Each of the postings is dated and time-stamped and includes the name and contact information of the person beginning the topic or responding.
The name of your Message Board will serve as the starting point for your topics and discussions. Once added, you will then add categories and topics from which visitors will be able to have discussions. To Add a Message Board:
Step 1
- Click on Add Message Board.
- Enter in the name of the board in the Message Board Name field.
- Select the Moderator. This list pulls from the site administrators.
- Enter in a password (optional).
- Enter in an email address in the Email Message to field if you wish to receive emails when a new message is posted (optional).
- Select Yes or No for Show on Site.
- Enter in a description of the board (optional).
- Hit Save.
Step 2
You can create unlimited categories under each board. For instance, the main board is titled English Department, a category could be General Discussions.
- Enter in the categories in the text field(s).
- Hit Save.
Step 3
Unlimited topics can be added to each category.
- Click on the add topic here link under the category.
- Enter in the Topic Title.
- Add in a question or comment on the topic (optional).
- Determine Yes or No to approve all messages.
- Determine Yes or No to name required to post a message to the topic.
- Determine Yes or No to Hide Email Addresses on the Front End.
- Determine Yes or No to allow files in the postings.
- Enter in a password (optional).
- Upload a file to be viewed on the topic (optional).
- Hit Save.
Members Tab - if Staff Members have opted-in to the board, you can view them by clicking on the Members tab.
Admin Tab - Additional moderators can be added via the Admin tab.
Delete Tab - deletes the entire Message Board. Select the Yes radio button and hit Save.
EDIT MESSAGE BOARD
To edit a Message Board:
- Click on Edit Message Board.
- Click on the applicable Category link.
- Make the appropriate updates.
- Hit Save.
To delete a posting to a particular topic:
- Click on Edit Message Board.
- Click on the applicable Category link.
- Click on the link below the Approve column.
- Click on the Delete tab.
- Select the checkbox next to the posting you wish to delete.
- Hit Delete.
When adding or editing a topic within the Message Board module, you can choose to hide emails on the front end. This will provide a level of security for your students.
To delete an entire board and all its threads:
- Click on Edit Message Board.
- Click on the applicable Category link.
- Click on the Delete tab.
- Choose the Yes radio button.
- Hit Save.
Mobileview
MAINTAIN SITE
MobileView allows users to easily browse your site on devices such as iPhone, Android OS, Blackberry, and several other mobile browsers. MobileView brings in important News, Calendar events, and Contact information. If you utilize the Sports calendar, sporting events are available to visitors via the Upcoming Events button.
To set up MobileView:
- Click on Maintain Site.
- The Main homepage and locations will be listed. Click on Main Page of Site.
- You can either upload a logo for the main page or type in the a name. Enter in the Name in the Short Name field.
- Enter in the label. If you do not want the locations listed, leave this label blank.
- Enter in the Homepage label. This label will be listed in the drop down in order for users to get back to the main page.
- Use the arrows to the right of the Content, Documents, Staff, News, Events, Contact, Menus, and Slideshows tabs to determine the order in which the tabs display. Click the Up arrow to move the tab up and the Down arrow to move the tab down. Note: if you do not want one of the tabs to show on the MobileView, simply delete the word in the tab's box.
- Select or type in a color for the main site. This will include the button color.
- Click Save.
- Repeat for each location.
To Upload a Logo:
- Click on Maintain Site.
- Select the Logo link to the right of the Main Page of Site.
- Browse for the logo. The logo should be between 200 and 300 pixels wide and 75 pixels high.
- Click Save.
To Activate MobileView:
- Click on Maintain Site.
- Select the check box at the bottom of the page to the left of Turn On.
- Click Turn On.
To Set an Application Icon:
- An Application Icon is the image a user puts on their screen to start an application, in this case the website. The icon should be a 57x57 pixel PNG image.
- Click on Maintain Site.
- Click on Application Icon.
- Browse for the file.
- Click Save.
News
ADD NEWS
Add a News Item:
-
Under News Items, click on Add News.
-
Type in a Headline (required).
- Select the Check to make this News Event Show up on Main Page checkbox if the news item should display on the home page.
-
Location - If you are a Webmaster or Newsmaster, select the location(s) the news item pertains to.
-
Show on Site/Story is newsworthy until - Select the show date and newsworthy until date (required). News item will display as active until 11:59 PM of the newsworthy until date.
-
In the box labeled Full News Description, type in your article.
-
Hit Save.
-
Upon hitting Save, you'll see the familiar tab system at the top allowing you to add images, files and links to your news item.
-
Add Picture – click on the Images tab, hit the Browse button and locate the digital image (.JPG or .GIF formats are best). Double click on the file of the image. Enter in a caption and select the alignment. A thumbnail of the image will display on the home page for most design templates.
-
Attach a File (optional) – click on the Files tab, hit the Browse button and locate the file you wish to add. Type in a Friendly File Name – this overwrites the technical name with a more descriptive title. Ex. of files – permission slips, meeting agendas. Files can also be referenced from the filing cabinet.
-
Add a Link (optional) click on the Links tab, type in the Friendly Link name in the first text box and full http URL in the second text box.
-
Hit Save.
EDIT NEWS
To edit a News Item:
- Click on Edit News.
- Select the month, year, and location. Hit Show.
- Click on the edit link next to the news item that you want to edit.
- Make the necessary changes.
- To add/edit an image, file or link, click on the appropriate tab.
- Hit Save after each edit.
To delete a News item:
- Follow the steps above for editing.
- Click on the Delete tab.
- Select the checkbox - Check this to Delete News...
- Hit Delete NEWS.
RSS FEEDS
RSS stands for Real Simple Syndication (or Rich Site Summary). RSS provides a way for websites to let people receive automatic summaries of new content that has been posted. This is called an RSS feed and is posted online as a text file in a format called XML.
Website RSS is available (newinfo.cfm) also and pulls in pages, news, calendar, filing cabinet and job posting updates. The updates only show if they will be happening within the next 30 days. Uupdates are pulled to the newinfo.cfm page every six hours; around 6 am, noon, 6 pm and midnight. If a site admin makes an update at 8 am, it will not appear until noon. Please contact the Support team to activate.
SORT NEWS
Sort News allows you to sort the order of the news items on the front end of the site.
*The system accepts a numerical range of 1.1 to 1.9.
If you have additional locations, click on the name hyperlink under the news title. News items for that particular location will display and can easily be sorted.
Policy Now
ADD NEW POLICY
The Policy Now Module makes your policy manual easy to navigate, simple to update, and readily accessible. It helps to ease the paper burden and reduces the related costs of maintaining a paper system.
Navigation is simplified with the dynamic table of contents and keyword search option. This tool also sets up policy information in a printable format. Administrators can easily update the policy information with one click.
To add a new board policy:
- Click on Add New Policy.
- Select the series it applies to.
- Hit Next.
- Policy - If the policy is approved for public display, select Open to Public from the drop down menu.
- New Group - If you'd like a subcategory level, enter in a New Group (optional).
- Enter in the Policy Number, Policy Title, and Adoption/Revised Date(s).
- Sort Order can be the same as the policy number.
- Policy content - The policy text can be copied and pasted into the Policy Text area. Note: if you're copying and pasting from Word, please click on the Remove Microsoft Word Formatting button to remove unnecessary HTML coding.
- Policy References - Enter in Policy References in the text box (optional).
- Cross References - If there are any cross references to the policy, select the checkbox for 'Check here if you need to cross reference this policy' and you will be able to enter in the policy numbers on the next screen.
- Upload a file by selecting the Browse button (optional). Enter in a friendly file name.
- Hit Save.
EDIT CURRENT POLICY
To edit a board policy:
- Click on Edit Current Policy.
- Click on the edit link next to the policy series.
- Click on the title of the edited policy.
- Make your updates.
- Hit Save.
To cross reference policies:
- Follow the first two steps above.
- Click on the Refs link next to the appropriate policy.
- Enter in the policy number.
- Hit Save.
- You can enter in policy numbers before they've been added to the system. Once they're added, the system will link them together.
POLICY SERIES SETUP
Policy Now is organized by the policy series.
To setup the Policy Series:
- Click on Policy Series.
- Enter in the series numbers (i.e. 1000, 2000 or 3000).
- Type in the series name (i.e. By-Laws, Community Relations, or Administration).
- Hit Save.
Polls
ADD POLL
The Poll module provides a great way to solicit public opinion, post a fun trivia question or have visitors vote between different options. Only one response per computer (browser specific) is accepted so that one visitor doesn't respond multiple times at a given time. This is based on a session variable so once the session has expired, a visitor can come back and submit the poll response again.
When activated, a Take My Poll icon will display on the homepage of the website.
To Add a Poll:
- Click on Add Poll.
- Enter in a poll question for visitors to respond to.
- You can enter up to 10 different responses (the first two are required).
- If the question has a specific answer, e.g. a trivia question, post it in the Answer - Optional field. This allows visitors to view it after taking the poll.
- If you have multiple locations, use the For Location drop down to select the location the poll should appear on.
- Select which dates the poll will display on the site using the Show and Hide date fields. The poll will not display until the Show date.
- Click Add Poll.
EDIT POLL
To Edit a Poll:
- Click on Edit Poll.
- Click on the blue link to the name of the poll in order to make edits. Hit Save.
- The Taken field displays the number of visitors that have responded.
- The view link displays results and tallies up the percentage of visitors who selected each option.
Please note that if more than one poll is active, the system will randomly select one to display each time a visitor views the site.
Quick Information
QUICK LINKS
QUICK LINKS
Quick Links appear on the Home page of your site for quick, easy access to the most popular areas.
Internal URLs do not need the full http://www address; you only need to copy in the folder name. For instance, a quick link to the filing cabinet would be documents.cfm. External links need the full URL http:// address.
Changing Quick Links:
-
Click on Quick Links.
-
Highlight the URL and/or the Friendly Link name you wish to change and retype the new information.
-
Make sure the Active checkbox is selected.
-
Click Save at the bottom of the form.
Sorting Quick Links:
Please note: If you would like more Quick Links fields added to the site, select the checkbox 'If you need more quick links...' and hit Save. System will add 2 more fields upon each save.
INFORMATION ALERT SYSTEM
The Information Alert System allows you to add a graphic to the home page for emergency closings, weather delays, important information, etc. You can select from the supplied bank of graphics or upload your own. The graphic will display on the homepage and visitors will click on it to access the information.
To Add a New Alert:
- Under Quick Information in the Admin area, click on Information Alert System.
- Click on add new alert.
- Select the graphic that best illustrates the alert you wish to post. You can also upload your own graphics via the add new alert image link. If you do not see this link, please contact support to add it.
- Below the list of graphics, enter in the Subject Info (optional) - this displays only in the Admin Area and provides better organization and assistance when looking through past alerts.
- Enter in the On Site Date & Time you wish it to begin appearing.
- Enter in the Off Site Date & Time. The system will remove the graphic on that date and time. Note: the time fields are EST.
- Details: type the details you wish to communicate.
- Click Save.
- Upon clicking Save, tabs for Graphics, Files, Links, and Locations will be available.
- Graphics: change the selected alert image.
- Locations: set the alert to display on all or specific building homepages.
- Attach Files: If there is an attachment that needs to accompany the alert, click the Browse button next to the text field entitled Attach File and type in a friendly name/title for the file. You can upload up to 3 files.
- Website Links: enter up to 3 links to the info alert.
Special Note: There is no need to return to the website to edit an Information Alert if the appropriate Off Site Date & Time is selected when the alert is added.
To Edit an Existing Alert:
- Under Quick Information in the Admin area, click on Information Alert System.
- Select Edit for the alert you wish to edit.
- Use the Main Info, Graphics, Locations, Files, and Links tabs to make changes. Click Save at the bottom of each tab you edit.
To Sort Alerts:
- If you have more than one active Information Alert added, you can sort the alerts to display in the desired order.
- Under Quick Information in the Admin Area, click on Information Alert System.
- Click on Sort Alerts (will only display if you have 2+ alerts active).
- Enter in the appropriate sort number and click Sort. The alert with the smallest sort number will display first, please note you can use decimals to sort.
To Re-enable an Old Alert:
- Under Quick Information in the Admin area, click on Information Alert System.
- Click old alerts.
- Select Edit Alert for the alert you wish to re-enable.
- Change the On Site Date & Time and Off Site Date & Time.
- Click Save.
Special Note: You can pre-populate alerts with a special graphic and details to quickly post as needed in the future (e.g. 2 Hour Delay or Snow Day messages). After the alert is used the first time, you can access it in the future via the old alerts link.
HOME PAGE BANNERS
HOME PAGE BANNERS
The home page banner module allows you to put a graphic on your home page and link it to a URL. It is a nice solution for placing banners to social networking sites, ENews sign up, Kindergarten registrations, etc.
The placement of the banners depends on your design template. A bank of default graphics is available for you use or you can upload your own custom graphic.
Add a home page banner:
- Click on the Home Page Banners link in the admin area.
- Title - Enter in a Title for the home page banner (optional). This will not display on the front end but will help in organizing/editing the banner in the admin area.
- Link to URL - Enter in a URL for the banner to link to. Note: this can link to an internal page or an external website.
- Image - Choose from one of the default banner choices by clicking on 'Use this link to add a Default Banner' link or upload your own image by clicking the Browse button. Please note the recommended sizing listed above the field.
- Start/Stop Showing - Use the Start Showing and Stop Showing fields to determine when it will be accessible. The Stop Showing field is optional.
- Click Save.
- Banner Locations - upon hitting save, you can select which location(s) the home page banner applies to, if applicable.
- Hit Save.
Edit a home page banner:
- Click on the Home Page Banners link in the admin area.
- Click on the link - edit existing.
- Select the edit link under the banner you would like to edit.
- Make your edits.
- Hit Save.
To sort home page banners:
- Click on the Home Page Banners link.
- Select the sort existing link.
- In the sort column, enter the number of the order you wish the home page banners to display. Entering in 0 for all will sort alphabetically. Integers can be entered such as 1.1 or 3.1.
- Hit Sort when finished.
To delete a home page banner:
- Click on the Home Page Banners link in the admin area.
- Click on the link - edit existing.
- Select the edit link under the banner you would like to delete.
- Select the checkbox next to Delete Banner.
- Hit Delete.
- Please note: deleted banners cannot be recovered.
Random
RANDOM PAGE IMAGES
When creating a subpage, you have the ability to pull from a bank of random images that will appear in the graphic headers and rotate with each refresh.
To Add Random Page Images:
- Click on Random Page Images.
- Setup a category name in the text field and hit Save.
- To add more categories, repeat the previous step.
-
Select the default checkbox for those categories you want the system to pull from. If the checkbox is unselected, that category will NOT be included in the overall default pull.
- Click on the Add link to add images.
- You can add 5 images at a time. Click on Browse and locate the image you want to add. (JPG and GIF formats work best.)
-
Double click on the picture file to add it.
-
The images you add will be resized to fit the display area.
-
Repeat the steps above to add the next 4 images.
-
Click Save.
-
Once the images have been added to the proper categories, go to the Site Content area, find the page and select the category via the Random Image Category. Hit Save.
NOTE: If you want to add more images, check the Check to add even more and then click Save. The first set of 5 images will be added and another page with 5 blank image text fields will appear. Follow the steps to add more images. There is no limit to the number of images you can add.
To edit/delete the images:
Site Content
SITE PARAGRAPHS
With the additional modules (the standard modules like calendar, lunch menu, jobs, news etc.), we give administrators the ability to add text and images at the top and sometimes below the module page.
When you click on Site Paragraphs, you'll see gray text under the page name. It gives a brief description as to its purpose. The Page On Site column links to the front end of the module and the goto address.
To add or edit a site paragraph:
- Click on Site Paragraphs.
- Click on Edit next to the appropriate intro/footer paragraph.
- Enter in text using the text editor.
- Some modules will allow the use of the RTE toolbar. To add an image, click on the Image Gallery button. Click on Browse and find the image on your PC.
- Click Save.
To delete paragraph text:
- Click on Edit next to the site paragraph you want to edit.
- Delete the content in the text area.
- Click the Save button at the bottom of the page.
To create a link to a module:
- Click on Site Paragraphs.
- Copy the .cfm URL for the module of interest (for example, News is news.cfm).
- Click on Site Content. Go to the area to add the page.
- Click on Add Page.
- Enter in the Page Title.
- Select GoTo page.
- Hit Continue.
- Enter in the .cfm URL - for example, news.cfm. You do not need the full http URL for internal pages.
- Hit Save.
Grouping of site paragraphs - groupings of site paragraphs can be created for better organization. Scroll down to the bottom of the page and click on Edit Group Categories. Enter in the group name in the textbox and hit Save.
ADDING VIDEOS
Adding Videos through the Insert Media Icon
To add videos from an outside source like YouTube, TeacherTube, or SchoolTube, copy the embed code provided and follow the instructions below.
To embed a video on a typical page:
- Place your cursor in the page text box where you would like the video to display.
- Click on the Insert Media icon
- Paste in the embed code.
- Click on Insert. Please Note: the video may not display in your Admin Area, you may need to view the page on the front end of the site to view the video.
- Click Save.
To edit a video:
Depending on your browser, you may be able to select the embedded video and click on the Insert Media icon to edit the video. In many browsers, you will need to delete the video and re-add using the Insert Media icon.
To delete a video:
Because of the different ways to embed videos and the browser combinations you may be using, please try one of the following methods to delete a video.
- Click on the video (white squares will appear around the video).
- Hit the delete or backspace button on your keyboard.
- Click Save.
- Click on the video.
- Select the Insert Media button.
- If you see the embed code, select the Delete button.
- Click Save.
- Click after the video (you may not see your cursor).
- Select the Insert Media button.
- If you see the embed code, select the Delete button.
- Click Save.
- Click after the video (you may not see your cursor).
- Hit the backspace button or delete button on your keyboard.
- Click Save.
ADDING WEBPAGES
There are two different types of pages that can be added:
-
Typical Page - This type of pages allows you to add your own content including text, images, files and links.
-
GoTo Page - This type of page allows you to link over to another existing page - be it an internal webpage, module, or external site.
Adding Text to your Webpages:
-
Click on the Page Info tab.
- Follow the fields on the form to add information to your site.
-
Show page on Site/Don't show page on site - you can work live or in draft mode.
-
The Navigation Title is required and will display in the left navigation column on the front end.
-
The Page Title will show up on the top of the page (optional).
-
The Sub Title will display beneath the Page Title (optional).
-
The Show Date/Hide Date option allows you to schedule the page to appear/disappear on determined dates. The page will not be deleted once the Hide date is reached, it will simply not show on the front end. It will still be available in the admin area as inactive. The pages can be set to active at a later date and time.
-
Each page has the ability to be password protected. To password protect your webpage, click on the Password Protect? link, enter in your password and hit Save. If you'd like to continue working on the page, click on the edit page link. To view the password prompt a visitor will see, click on the view page link.
-
Add copy to your page in the Page Text section. Please refer to the RTE help section for more details on the toolbar features.
-
Save your work! Click the Save button when you are finished typing in your text.
Note: You can mass activate or hide a section of subpages. This option will display for sections with 3+ subpages below the Update button. Use the Select All link to change all subpages to Show on Site and use the Deselect All button to change them to Do Not Show on Site.
With the new In-Line Editor, authorized users will always be just a click away from adding content using the same powerful editing experience offered in the administration area. Authorized users will be able to edit rich content right from the front end of the website, allowing users to see how the content will look before it goes live.
To Set Up In-Line Editing:
- Click on Web Pages and then on Front-end Editing Options at the bottom of the page.
- Select either Admin Area Only, Allow Admin to Decide, or Allow only Webmasters to Decide.
- Admin Area Only: This option will only allow admins to login to the admin area before being allowed to edit or manage any website content. What each site is set to by default.
- Allow Admins to Decide: This option will allow each admin to decide if they want to set their own personal computer with the login ability. Once logged in, they will be able to manage content from the front of this site (they can only edit pages they have rights to). The system will send a cookie to their computer which will trigger the site to display an "EDIT PAGE" on every site-content page area on the front of this site. Other visitors to the site will not see this login feature - only persons using that particular computer will see the link. The link will be at the bottom of every page on the site.
- Allow only Webmasters to Decide: This option will allow each webmaster admin to decide if they want to set their own personal computer with the login ability. This system will also use a cookie to determine which computer shows the edit/login links.
Front-End Editor:
- If the main webmaster has allowed webmasters or administrators to decide their own personal settings, each administrator will need to set up their front-end editor.
- We recommend using Firefox when editing. Please make sure you are setting your Front-end Editor options from the same browser you will be editing from. If you will use Firefox for editing, please make sure you are in Firefox when you set your options.
- Click on Front-end Editor.
- Select either: Option 1 - Admin Area Only, Option 2 - Allow Editing, or Option 3 - Allow Editing Added Security.
- OPTION 1 - Admin Area Only: This option will only allow you to login to this admin area before being allowed to edit or manage any website content.
- OPTION 2 - Allow Editing: This option will allow you set this computer with the login ability. Upon saving the info below, the system will set a cookie to this computer which will trigger the site to display an "EDIT PAGE" on every site-content page area on the front of this site. Other visitors to the site will not see this login feature - only persons using this particular computer will see the link. The link will be at the bottom of every page on the site.
- OPTION 3 - Allow Editing - Added Security: This option will also allow you to edit pages on the front of the site, but for added security, it will ask for your password each time you select a page to edit.
We recommend this option if this computer is PUBLIC.
- Other Users on this Computer: select if the computer you are using is private or public.
Editing a Page using the In-Line Editor:
- On the front end of your site, Navigate to a site-content page (Site Paragraphs, news items, and calendar items cannot be edited from the front-end). We recommend using Firefox when editing.
- Click LOGIN located in the bottom left corner.
- Enter in your First Name, Last Name, and Password.
- Click Edit Page. You will only be able to edit the page if you have rights to the page.
- Edit the page as you typically would.
- Click Save.
- To navigate to the full editing options for the page, click Full Editing Options.
ADDING/EDITING IMAGES
The system will make a copy of any image you upload off your desktop and add it to the server - that's why it's important to upload files and images via the Browse button and not drag and drop. There are a few different options for adding pictures to a webpage:
1. Images on Page: The Page Photo is a picture that displays alongside the text on the page. There are two options for placing photos on the page. The photo can be lined up on the right-hand side of the webpage or it can be centered in rows below the copy. You can upload one or two at a time or you can click on the Add Zip File link to upload up to 45 images at once.
Add New Images:
-
Click on the Images tab.
-
Click on the Images on Page link.
-
Click on the Browse button.
-
Locate the photo. Double click the photo to add it to your webpage.
-
Enter in a caption (optional). This will also be the Alt tag on the front end for compliant readers.
-
Enter in more info on the photo (optional).
-
Link image to a URL (optional).
-
The system has automatic-image resizing, so you can reduce the image between 100 - 400 pixels by selecting from the drop-down menu. Note: small images uploaded cannot be increased in pixel size.
-
Image Layout - Page - for images to appear below your copy, choose 0 images to the right of your copy then determine how many should appear in each row.
-
Hit Save.
Note: If you add 5 or more images to a page, a slideshow feature will appear on the front end once an image is clicked on.
Edit Images:
- Click on the Images tab then Images on Page.
- Show link will display the image.
- Edit link will allow you to upload a new image, edit the image caption or URL link.
- Sorting images - once you've added 5 images to a page, an option will appear to sort alphabetically by file name or upload date (newest).
- CROP your image will allow you to select a certain portion of the uploaded image to display. Please note cropping the image will change the size the image displays on the front end of the site.
2. Headline Image is meant for single images that are centered above the title of the page. Good size parameters for headline images: 500 pixels wide by 80 pixels high.
Adding a Headline Image:
-
Click on the Images tab.
-
Click on Add Headline Image link.
-
Beneath the Headline Image at the top of the page, Click on the Browse button.
-
Locate the picture. Double click the picture to select it.
-
Hit Save.
Tip: This process is the same as adding an attachment to an email.
3. Clip Art - the system has royalty-free clip art graphics for you to use. The icons will appear in the upper right corner of the webpages. For more flexibility in the placement of the icon, click on the Page Info tab and add the clip art via the Image Gallery.
Add Clip Art:
4. Slideshows - slideshows added via the Slideshow module can be referenced on any typical page.
- Click on the Images tab.
- Click on Attach to the right of the slideshow you wish to add.
- Select Play to the right of the slideshow if you want the the slideshow to automatically play when navigating to the page.
- Hit Save.
ATTACHING A FILE
Attaching a File to a Webpage:
Files can be any type of attachment and cover a variety of formats. (Note: Do not upload executables). Files can be PowerPoint presentations (.ppt) , Adobe Acrobat files (.pdf), Video presentations (.avi), or Music files (.wav or .mid). It can be any type of information that you would like parents and students to find on your website – newsletters, worksheets, permission slips, handbooks, dress code, discipline procedures, classroom policies, song recordings, pictures of student artwork.
Site contributors also have access to any file added to the filing cabinet to reference on their webpage. Each user has the ability to add an unlimited number of files to each webpage they create.
To attach a file:
-
Click on the Files tab.
-
Under “Upload New Files”, click the “Browse” button on the right.
-
Locate the file and double click on it to attach it to your page.
-
Next to Friendly File Name, type in a recognizable name for the file. This will display instead of the technical file name.
-
Type in a description of the file (optional).
-
Click Save.
To attach multiple files at once:
- Click on the Files Tab.
- Select the ADD MULTIPLE FILES AT ONCE link.
- Click on the Add File button
- Select the files to add (hold the Ctrl key down to select multiple files at once) and click on Open.
- Click the Upload Now button.
- To rename the files, select the go back to label and sort the new files uploaded link at the top of the page.
To reference a file on a page:
Files can be referenced on a page from the filing cabinet. When the file is updated in the filing cabinet, the system will also update it where ever it's referenced on a page.
-
Click on the Referenced link.
-
Click on the category link.
-
Select the checkbox next to the file(s).
-
Hit Save.
To remove a referenced file from a page, click on the Referenced link, deselect the checkbox and hit Save.
Visitor Uploads - this area allows you to accept files from the public.
-
Click on Visitor Uploads.
-
Select the File Accept Option checkbox.
-
Hit Save.
Form fields will display on the front end allowing site visitors to upload files to that particular page. The files can then be viewed and retrieved in the admin area under the Files tab.
Note: You can select the On Site checkbox in the Current Visitor Uploaded Files section if you wish to display a visitor file on the page it was uploaded to.
COMMONLY ASKED QUESTIONS
Q: I copied and pasted content onto the page and the format is all askew or I've reached the 64,000 per page character limit.
A: If you copy and paste content from Microsoft Word or another program, either paste the content into Notepad first and then into the page text area OR paste into the page text area and click on the Remove Microsoft Word Formatting button (located on the 1st row of the RTE toolbar). This will remove any bad HTML coding that is causing issues with the editor.
Q: I uploaded an image and it's not displaying properly.
A: Check to make sure there are no spaces or symbols (* for example) in the file name. These can sometimes affect the image upload process. For example, a good image file name would be fieldtrip.jpg
You should also make sure that the image is in RGB format (NOT CMYK).
Q: I tried uploading an image to the Image Gallery and am receiving an error message Error - Process Aborting Your file is too big.
A: If you're trying to upload an image directly off of a digital camera, it's probably over the 2.5 MB size limit. Use a photo editor such as Photoshop or Kodak Easyshare to size the image down before trying to upload to the Image Gallery.
Q: I embedded a hyperlink and it's displaying a Page-Not-Found message.
A: If linking to an external page, check to make sure http:// is included at the beginning of the URL. For example, http://www.google.com as opposed to www.google.com
NEW RICH-TEXT EDITOR TOOLBAR (RTE)
The following document will take you through the new toolbar and specifically how each icon functions. Many of the icons are similar to the previous toolbar, but have additional new features.
Styles Dropdown
The Styles dropdown allows you to use predefined formatting to stylize your text. To use, select your text, click on the Styles dropdown, and select the appropriate style.
Format Dropdown
The Format dropdown allows you to use predefined formatting to stylize the paragraph format. This allows you to keep the text size throughout your site uniform. To use, select your text, click on the format drop down, and select the appropriate style.
Font Dropdown
The font dropdown allows you to change the font used for your text. To change the text, highlight your text, select the font dropdown, and click on the appropriate font.
By default, the font will be Verdana.
Font Size Dropdown

The font size dropdown allows you to change the font size used for your text. To change the text, highlight your text, select the size dropdown, and click on the appropriate font size.
By default, the font size will be 14.
Bold

The B icon allows you to bold your text. To use, highlight your text and select the bold icon.
Italic

The I icon allows you to Italicize your text. To use, highlight your text and select the italicize icon.
Underline

The U icon allows you to underline your text. To use, highlight your text and select the underline icon.
Strikethrough

The strikethrough icon allows you to strike the text through (horizontal line through text). To use, highlight your text and select the strikethrough icon.
Subscript and Superscript


The subscript and superscript icons allow you to add your text as a subscript (slightly smaller and set below surrounding text) or superscript (slightly smaller and set above surrounding text). To use, highlight your text and select the subscript or superscript icon.
Remove Formatting

The Remove Formatting icon will strip all text formatting, leaving you with just text. To use, highlight the text and select the remove formatting icon.
Text Color
The text color icon allows you to change the color of your text. To use, highlight your text and select one of the predefined colors. For more color options, select More Colors.
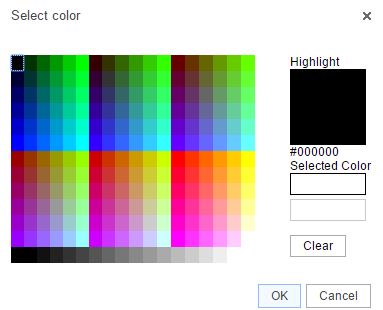
Once More Colors is selected, you can select a color or enter a hex code (hex code must start with #).
Background Color
The background color icon allows you to change the text background color. To use, highlight your text, select background color icon, and select a color. You can select more colors for more color options.
Numbered List

The number list icon allows you to create an organized list using numbers. To create a numbered list, click on the numbered list icon and type your text, selecting enter on your keyboard for the next number. You can also highlight text that is already on your page and click on the numbered list icon.
Once you have your numbered list, you can right click within your list to change the numbered list properties. The properties will allow you to change the start number and the list type.
Each layer of a list can use a different list type so you can use both numbers and letters for example.
Bulleted List

The bulleted list icon allows you to create an organized list using shapes as the marker instead of numbers. To create a bulleted list, click on the bulleted list icon and type your text, selecting enter on your keyboard for the next line. You can also highlight text that is already on your page and click on the bulleted list icon.
Once you have your bulleted list, you can right click within your list to change the bulleted list properties. The properties will allow you to change the shape of the bullets.
Decrease and Increase Indent
Th

e increase indent icon allows you to indent your text on the page. The decrease indent icon will move your text to the left one tab length. To use, highlight your text and select the icon. You can also place your cursor before or after your text and select the icon.
Block Quote

The block quote icon allows you to distinguish a piece of text by having it indented from the left and right. To use, highlight your text and select the block quote icon or select the block quote icon and enter text.
Alignment

The alignment icons (left, center, right, and justified) allow you to change the placement of the text. To use, highlight your text and select the appropriate alignment icon.
Source

The source icon allows you to see the HTML of your page. The source icon replaces the HTML tab that was previously at the bottom of a page.
Templates

Similar to the templates drop down in the old toolbar, the templates icon allows you to use a predefined page structure for creating content. To use, select the templates icon, click on the template to use, and begin entering your text.
Cut

The cut icon allows you to remove text from the page. To use, highlight the text and select the cut icon. You can also highlight the text, right click, and select cut.
Copy

The copy icon allows you to copy a piece of text. To use, highlight the text and select the copy icon. You can also highlight the text, right click, and select copy.
Paste

The paste icon allows you to paste text from an outside source onto the page. To use, place your cursor where you would like the text to display and select the paste icon. Depending on your security settings, you may need to paste the text into the paste window first. You can also right click on the page and select paste.
Paste as Code

The paste as code icon replaces the insert media icon from the old toolbar and allows you to enter embed code on your page (from YouTube, SchoolTube, Voki, etc.). To use, place your cursor where you would like your widget/video/etc. to display, select the paste as code icon, enter the code, and click ok.
Paste as Plain Text

The paste as plain text icon will allow you to paste in text without preserving any formatting. To use, place your cursor where you would like the text to display, click on the paste as plain text icon, paste the text in, and click on ok.
Paste from Word

The paste from word icon will allow you to paste text from Word and keep basic formatting. To use, place your cursor where you would like the text to display, click on the paste from word icon, paste in the text, and click ok.
Undo

The undo icon allows you to remove the last change on the page.
Redo

The redo icon allows you to add the change back to the page that was previously removed with the undo icon.
Find

The find icon allows you to locate a specific word or phrase within the page.
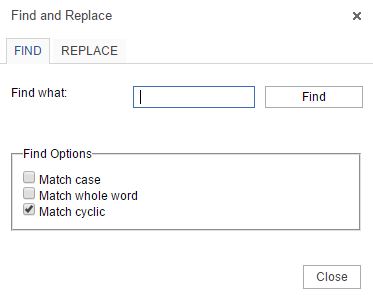 Match case:
 Allows the search to be case sensitive (uppercase and lowercase will matter).
Match whole word: Will only find the entire word. For example, if searching for test the results will not include the word testing.
Match cyclic: Will allow the search to go through the entire page and not stop at the bottom of the page.
Replace

The replace icon allows you to search for a word and replace it with another word.
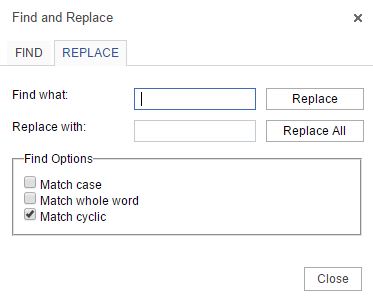
To use, enter the word to find in the find what field and enter the word to replace it with in the Replace with field. Select Replace or Replace all.
Select All

The select all icon selects all of the content on a page, allowing you to change all of the font, size, etc.
Hyperlink

The hyperlink icon allows you to add a link to a piece of text. To use, highlight the text you would like to link and click on the hyperlink icon.
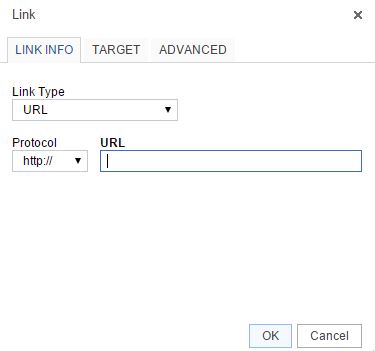
Select the link type:
URL: creates a link to a web address
Link to anchor in the text: creates a link to an anchor you have previously created on the page.
Email: creates a link to an email address.
Protocol: this allows you to change the beginning portion of the link, for example http:// or https://
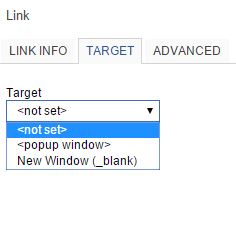
The target tab allows you to determine how the link opens.
Not Set: link opens in the same browser window or tab.
Popup Window: link opens in a popup window that overlays the page. If you select Popup Window you can set parameters for the window.
New Window: link opens in a new tab.
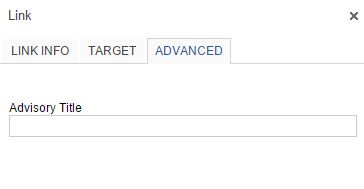
The advanced tab allows you to enter the link title, which will display when users hover over the link.
Remove Hyperlink

The unlink icon removes a hyperlink. To use, highlight the hyperlink and click on the unlink icon.
Anchor

The anchor icon allows you to put a marker within your text that you can link to.
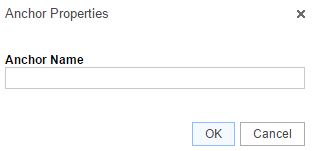
To add an anchor, place your cursor where you would like to add the anchor. Click on the anchor icon and enter the anchor name. An icon will be added to your page (only visible in the admin area).
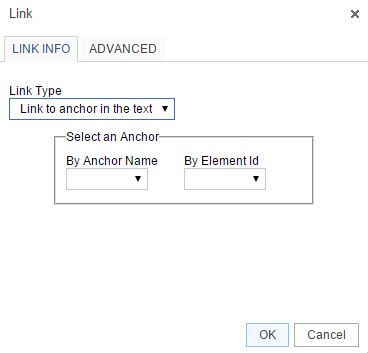
To link to an anchor, highlight the text you would like to link and select the hyperlink icon. Change the Link Type drop down to Link to anchor in the text and select the correct anchor from the anchor name drop down.
To remove an anchor, right click on the anchor icon within your text and select remove anchor.
Image Gallery

The image gallery allows you to add images directly to your page. To add, place your cursor where you would like the image to display and click on the Image Gallery icon.
Embed PDF

The embed PDF icon allows you to add a PDF directly to your page so visitors can see the PDF on the page without having to click to open a file. To use, place your cursor where you would like the PDF to display, click on the embed PDF icon, paste in the PDF URL (upload to the Filing Cabinet first), update the height, and click on OK.
Insert Table

The table icon allows you to add a table to your page. To use, place your cursor where you would like the table to display and click on the table icon. Enter the number of rows and columns. Instead of the additional icons for table editing, you can now right click on the table for table properties.
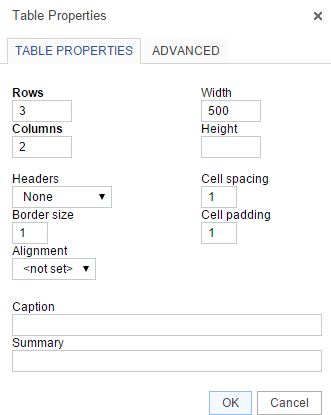 Rows
Rows – number of rows in the table
Columns – number of columns in the table
Headers – Can apply header formatting (centered and bold to specific rows
Border Size – thickness of table borders, 0 will remove lines
Alignment – changes the alignment of the table on the page
Width – changes the width of the table
Height – changes the height of the table
Cell Spacing – changes the space between individual cells
Cell padding – changes the space between the cell border and the contents
Caption – title of table, displays above the table
Summary – provides screen readers with a summary of the table
Cell Options
To retrieve this menu, right click within a table cell and hover over Cell.
Insert Cell Before – adds a new cell before the cell you have selected
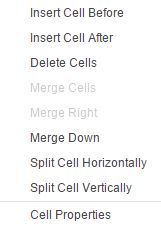 Insert Cell After
 – adds a new cell after the cell you have selected
Delete Cells – deletes the cell you have selected
Merge Cells – merges the cells you have selected into one cell
Merge Right – merges the cell you have selected with the cell to the right
Merge Down – merges the cell you have selected with the cell below
Split Cell Horizontally – splits the cell you have selected in two, adding a cell to the right
Split Cell Vertically – splits the cell you have selected in two, adding a cell below
Cell Properties – Opens Cell Properties window
Cell Properties
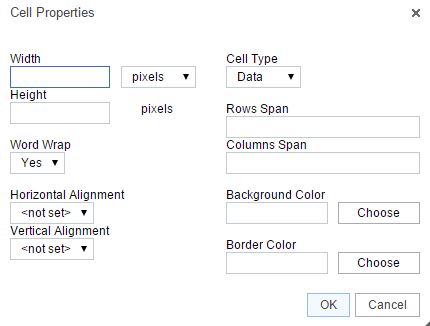 Width
Width – changes the width of the cell
Height – changes the height of the cell
Cell Type – changes a cell from a header to a normal data cell
Word Wrap – turns word wrap on for the cell
Rows Span – changes the number of rows the cell covers. Enter number of rows the cell should stretch over.
Columns Span – changes the number of columns the cell covers. Enter number of column the cell should stretch to.
Horizontal Alignment – changes alignment for cell
Vertical Alignment – change the vertical alignment for cell
Background Color – changes the color of cell background
Border Color – changes the color of the cell border
Table Row Options
To retrieve this menu, right click within your table and hover over Row.
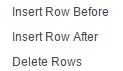 Insert Row Before
 – adds a new row above the row you have selected
Insert Row After – adds a new row below the row you have selected
Delete Rows – removes the row(s) you have selected
Table Column Options
To retrieve this menu, right click within your table and hover over Column.
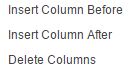 Insert Column Before
 – adds a new column to the left of your selected column
Inserts Column After – adds a new column to the right of your selected column
Delete Columns – removes the column(s) you have selected
Insert Horizontal Line

The horizontal line icon allows you to enter a horizontal line to your page, spanning from one side of the page to the other. To use, place your cursor where you would like the line to display and select the Horizontal line icon.
Smiley

The smiley icon allows you to add emoticons to your page. To use, place your cursor where you would like the emoticon to display, select the smiley icon, and select the graphic to add.
Insert Special Character

The insert special character icon allows you to add a character to your page that is not part of your keyboard. To use, place your cursor where you would like the character to display, select the insert special character icon, and click on the character to add.
Maximize

The Maximize icon allows you to expand the page content area so it takes up your whole screen.
SITE CONTENT - OVERVIEW
This product allows you to setup and maintain your own set of 8 main navigational buttons. It's important to give some thought to your main navigation structure as it is one of the first features visitors will see on the homepage and aids with navigation throughout the website.
Once the main navigation buttons are setup, you can proceed with adding as many subpages as you'd like below each section. The Adding Webpages help section reviews adding subpages.
Note- Due to the number of problems we were getting from people using javascript or bad HTML in the navigation and page titles, we encoded all HTML and javascript in those fields. So HTML is no longer allowed in the navigation title.
With the new In-Line Editor, authorized users will always be just a click away from adding content using the same powerful editing experience offered in the administration area. Authorized users will be able to edit rich content right from the front end of the website, allowing users to see how the content will look before it goes live. For more information on the In-Line Editor, please review the Adding Webpages Help Section.
VERIFY RELATED LINKS
Related Links - This section will list all the existing related links on the district/school sites that were added via the Links tab on a typical page. It will check their status; verifying that the URL is still live and responding. As the links are verified, there will be a status next to each link. If necessary, you will be able to edit the link from the appropriate edit link.
Since each link needs to be verified by accessing the site - this may take up to three minutes to return results. There is a five second timeout period set for each link (if site does not respond within five seconds, the next link is checked).
Slideshow
ADD SLIDESHOW
The Slideshow feature can showcase photos from any event, project or classroom activity. You can upload up to 99 images, categorize them and display them in an attractive "slideshow viewer" or thumbnail format.
To Add a New Slideshow:
- Click on Add Slideshow.
- Slide Show Title: Type in the name of the slideshow in the text field.
- Category: Select a Category from the drop-down list. These are setup under Slideshow Categories.
- Add an optional introductory paragraph in the text box for Description. The description will appear before the pictures.
- Click Next to continue.
- A link will appear at the top, View Slideshow. This will take you to the front end of the slideshow. You can include the slideshow on any webpage or create a goto page to it. Copy and paste the URL beginning with slideshows.cfm. For example, the URL would be slideshows.cfm?newslideid=15
- There is a 99-image limit for each slideshow. It's best to start with photos that are near 425 pixels wide by 275 pixels high.
- Transitions: select the transition for the front end (optional).
- Password: each slideshow can be password protected so viewers would need to enter in a password before viewing the images (optional).
- Show On Site/Show Off Site: enter in the dates when the slideshow should appear and disappear from the front end.
- Upload Image 1: Add images by clicking on the browse button.
- Image Caption: Add an optional Image Caption that will show directly under each image.
- The images will appear in the order they were added. If the order of the images needs to be changed, the Sort# field above the Upload Image can be changed.
- Click the Save button at the bottom of the page.
- A ZIP file of images can also be uploaded - click on the use this page link at the bottom of the form.
- Click on Browse.
- Locate the file.
- Hit Save.
- Please note - there is a limit of 4560 kB for each image converted and a limit of 99 images per slideshow.
To Link to an Existing Slideshow:
- On typical webpages, the Images tab has an option to attach slideshow(s) to a page. They can also be set to auto play on a typical page.
- You can link to slideshows.cfm which will display a page of all active slideshows.
- You can link to a specific category of slideshows using the ID number provided in the Slideshow Categories section.
- You can link to a specific slideshow (the URL to use will be near the top of the edit slideshow page).
EDIT SLIDESHOW
To Edit a Slideshow:
- Click on Edit Slideshow.
- Click on the slideshow title.
- Make the necessary updates.
- If the order of the images needs to be changed, the Sort# field above the Upload Image can be changed.
- To replace an image, simply click on Browse and locate the new image. The image will be replaced.
- Click the Save button at the bottom of the page.
To Delete a Slideshow:
- Scroll to the bottom of the page.
- Check the click here to delete this slideshow - then hit save and click on Save.
To Expire a Slideshow:
- Click on Edit Slideshow.
- Select the expire link to the right of the slideshow title.
- Once a slideshow has been expired, you will need to click on the Show Inactive link to access the slideshow.
SLIDESHOW CATEGORIES
The Slideshow module is organized by categories.
To add a Slideshow Category:
- Click on Slideshow Categories.
- Type in the name of the new Category in the blank text box.
- Select a location (if multiple locations).
- If the order of appearance of the categories needs to be changed, edit the Sort field to the left of the category.
- ID number - you can link directly to a specific slideshow via its ID number. Click on the ID hyperlink and copy the URL.
- Click on Save to add the category.
Please note: You cannot delete a category if it is being used. To delete a category, you must first delete the slideshows associated with it.
Spotlight
ADD STORY
The Spotlight feature is a great way to highlight special events, student successes or important district news stories. It is a feature that can be included on custom sites or specific pre-designed templates.
To add a Spotlight story:
- Click on Add Story.
- Enter in a Title.
- Add a Description.
- Select a location. If you're admin rights are location-limited, your location selections will reflect the limitation.
- Active on Site? - select Yes or No.
- On Site/Off Site Date Fields - enter in the dates when the story should appear and disappear from the front end of the site.
- Sort # - you can select the sort order for the spotlight story. System will default to the last sort number. Tip: system sorts first by the 'sort number'. To have the active Spotlights randomly display on the home page, set the sort number to 1.0. If you do want one to show up all the time, change the sort number to be .5 or something less than 1 to have it show.
- Image 1 - click on the Browse button to upload the image. Image 1 will appear on the home page (if applicable) and be reduced to the correct size. Please note the size recommendations as system will not allow an image less than the recommended proportions.
- Large Image - select the pixel size for the main spotlight page.
- Caption - enter in a caption for Image 1 (optional).
- Hit Save. Note: Depending on your site design, you may be taken to a new screen allowing you to CROP Image 1.
- Crop Image - Click inside the image to view the crop window. You can hold your mouse down to move the crop window to the desired position.
- Hit Crop Image.
- System will display the edit story form so you can add up to 4 more images to the spotlight story.
EDIT STORIES
To edit a Spotlight Story:
- Click on Edit Stories.
- Click on the EDIT link next to the story needing editing.
- Make your edits.
- Hit Save.
To delete a Spotlight Story:
- Follow the steps above to edit a story.
- Scroll down to the bottom of the form.
- Select the 'check here to delete spotlight' checkbox.
- Hit Save.
- Note: if you do not delete a spotlight story, it will be archived on the site for visitors.
Staff Directory
ADD STAFF MEMBER
Our Staff Directory gives site visitors the ability to search all staff members by first name, last name, location, subject area, grade level, department and/or position. The information is readily accessible; eliminating the cumbersome search through long lists of staff names.
Adding Staff Members:
-
Under Staff Members, click on Add Staff Member.
-
Check the applicable location(s) for the staff member.
-
Type in First Name, Last Name, Email Address (required).
-
The rest of the fields are optional.
-
Hit Save.
If the staff member has a TeacherSite, the system will automatically tie it to the staff account. It will be displayed on front end for visitors.
If you do not want the email addresses for staff to appear on front end, please contact support. Email addresses can also be obfuscated on the front end.
DEPARTMENTS
Adding Departments
- Under Staff Members, click on Departments.
- Type in department name in the text field.
- Update the sorting by entering in the appropriate number in the sort column.
- Hit Save.
Removing Departments
- Click on Departments under Staff Members.
- You will see a checkbox to Check to Delete.
- Select the box and hit Save.
Note: Please be sure there aren't any staff members attached to your Department before deleting, otherwise it will not allow you to delete the department.
EDIT STAFF MEMBER
Editing Staff Members:
-
Under Staff Members, click on Edit Staff Member.
-
Locate the staff member via search fields or click on the letter hyperlink - letter is the start of their last name - for example, click on S for last name of Smith.
-
Click on the hyperlink of staff member's name.
-
Make your edits.
-
If you have the Intranet module, you can add internal only staff info such as home address, summer address, etc. via the 'Modify additional staff details' link.
-
Hit Save.
Note: Under Edit Staff Member, the field for Current Status is determined by the expiration date field. If an expiration date is entered for a staff member, their status will be inactive.
Edit Staff Member defaults to displaying active staff members so the inactive members can be filtered out yet still be maintained in the system.
Download Data:
- Click on Edit Staff Members.
- Click on Download All Staff.
- Select the fields to download and hit Prepare for Download.
- Select the report format button you prefer - Create Excel Report or Create PDF Report.
Email Staff Members:
- Click on Edit Staff Members.
- Click on Email Staff Members.
- Enter in the Subject.
- Select the Importance.
- Enter in the email message.
- Hit Send Email.
STAFF GRADES
To add Staff Grades:
-
Click on Staff Grades.
-
Enter in the grade in the text field.
-
If the order of the grades needs to be changed, the sort field to the left of the grade level name can be changed.
-
Click the Save button at the bottom of the form.
Special Note: When a change is made to the Staff Grades, it is immediately available for selection for new staff entries or existing staff entries.
STAFF PASSWORDS
The Staff Passwords area manages the TeacherSites and Intranet passwords for staff. It is the same password for both modules.
Assigning Staff Member Passwords:
- Under Staff Members, click on Staff Passwords.
- Search for the staff member you want to assign a password. You can search by either part of a name or password. You can also click on either without a password or already with password.
- Next to the staff member name, enter in the Password.
- When entering in a new password, click on the checkbox to email staff of the change.
- Hit Save.
Note: At the bottom of the form, there are links for setting default passwords and emailing all staff at once. A message can be entered for the email communication. Hit Save.
STAFF POSITIONS
Staff Directory
There are three sections that work together to make up each entry on the Staff Directory – staff positions, staff grades and staff subjects. Each of these lists can be maintained within the website admin in conjunction with changes/additions to each individual staff member.
Maintaining Staff Positions:
-
Click on Staff Positions.
-
Any changes can be made by highlighting and typing over current positions.
-
If a new position needs to be added, scroll to the bottom of the staff positions list. Type in a new position.
-
If the order of the positions needs to be changed, the sort field to the left of the position name can be changed.
-
Click on the Save button at the bottom of the form.
Special Note: When a change is made to the Staff Positions, it is immediately available for selection for new staff entries or existing staff entries.
STAFF SUBJECTS
Maintaining Staff Subjects:
-
Click on Staff Subjects.
-
If a new subject needs to be added, scroll to the bottom of the staff subjects list. Type in a new subject in the text box provided.
-
Any changes can be made by highlighting and typing over current subjects.
-
If the order of the subjects needs to be changed, the sort field to the left of the grade level name can be changed.
-
Click the Save button at the bottom of the form.
Special Note: When a change is made to the Staff Subjects, it is immediately available for selection for new staff entries or existing staff entries.
TEACHERSITES
Setting Up TeacherSites Accounts:
- Under Staff Members, click on TeacherSites.
- Click on the letter of the staff member's last name or search by any part of their name in the provided fields. Hit Find.
- Once you locate the teacher, make sure the word NONE is in the website column.
- Click on the hyperlink of their name.
- Directory Name and Password: The system will automatically assign a directory name and temporary password. Teachers can update the password once they login.
- Show on Classroom Pages - Yes/No determines if the site will display on the front end of classroompages.cfm. Teachers can also set this once their site is ready for public viewing.
- Choose the page identity and page design.
- Select the checkbox to notify staff member of account and login info.
- Hit Save.
Saving creates a directory on the server for the teacher's content and becomes part of the teacher's URL. For example, Mark Beehler.
The default directory for Mark Beehler would be mbeehler. The URL of his classroom website would be:
www.yourdomain.org/webpages/mbeehler
When the teacher is ready for their site to go live, they or the district administrator should set 'Show on Classroom Pages' to Yes.
Note: To mass-change TeacherSites to show or not show on classroompages.cfm as well as the staff directory page use the "On Classroom Pages - Click to change" link in the TeacherSites section. This can be changed per Location (if applicable) or for the entire district (via the Change ALL STAFF option).
Changing TeacherSites Ownership - Webmasters have the ability to reassign a staff member's TeacherSite to a new teacher. For example, one teacher retires and the new teacher would like to continue using the existing account.
- Make sure the new staff member has been added to the staff directory and does not currently have a TeacherSite assigned.
- Search for current teacher via TeacherSites link.
- Click on blue name - edit link.
- Click the TRANSFER SITE link.
- Click Continue.
- Use the drop-down menu to select the name of the new staff member who should have rights to the account.
- Enter in the confirmation number and click Confirmed.
Note: It is a good idea to change the password on the site and send an email to the new staff member with their access. You can also update the directory for the site if the new teacher would like it to use his/her name.
Restoring Deleted TeacherSites - Webmasters have the ability to restore a deleted TeacherSite within a 30-day window. When deleting TeacherSites accounts, it is a best practice to not delete the staff account right away but to expire the account in case the TS needs to be restored.
- Under Staff Members, click on TeacherSites.
- Search for the staff member that needs his/her site restored.
- Select the Please click here to begin the process of restoring this website link.
- Select Next.
- Click on Recover Site.
TeacherSites Stats - This area displays the number of TeacherSites and last login information broken down by location. The link for Login < 30 Days, < 5 Logins will display all of those teachers that have logged in less than five times in the last 30 days.
This report can be filtered by Location by using the Location Filter drop down. There is also a link for TeacherSite Visits and Blog Usage. This displays the top 100 total number of visits to a given teacher's website for the selected month. Clicking on a teacher's name will then break down that particular teacher's visits per month for the given year (unique visitors). If you would prefer to view the TeacherSite Visits for a specific date range (the year for example), select the Would you rather use a Date Range instead? link at the top of the page. Enter in the date range (month and year only) and select Show.
Template Choices - This area will give you control over the template selection for teachers. If there are designs that shouldn't be available to teachers because of district policy or union contracts, you can select the checkbox of the design to 'hide' and hit Save. The design(s) will no longer be available for selection.
Combined Calendar Option (Webmasters Only) -
When teachers start using their calendars for classroom events and homework, some families can benefit from having one combined calendar so they can see all events (from multiple teachers) on one screen. By default, this is turned on for everyone. As a Webmaster, you can also decide to turn this feature off, if necessary. Simply select No to turn off and hit Save.
Users
EDIT YOUR INFORMATION
This area maintains your personal password and email address for login purposes to the admin area. If you'reusing the LDAP module, you may not be able to update this information.
To change your password:
- Click on Edit your information.
- Enter current password in the text field next to 'Current Password'.
- Enter the new password in the text field next to 'New Password'.
- Re-enter new password in the text field next to 'New Password'.
- Hit Save.
To change email address:
- Click on Edit your information.
- Delete existing email address and enter the new email address.
- Hit Save.
Web Master Admins Only
CHANGE META TAGS
Meta Tags
When an individual visits Google, Bing, or Yahoo to find a website, they must first enter their search criteria. Then, the search engine sends out robots to search for sites with those meta tags.
The meta tags are keywords which search engines look for to find and index your site. It is important to capture all of the words that pertain to your website. Therefore, if someone is searching for your website, it is likely it will come up in their search.
Also, it's best to concentrate on the text of your pages. The search engines will index and give weight to the actual text on all the pages of your site; the meta tags are something of an old-school way of thinking and some engines may ignore them altogether these days. The robots.txt file is still considered useful and most engines will spider this page as a beginning point so the words and description entered in the Change Meta Tags area will in fact be considered.
It may take up to a month for the meta tags to propagate throughout the search engines.
Facebook Information
To make your site more Facebook friendly, enter in a title for your title, description of your site, and an image. To upload and image, select Browse, and select the image. This information will display when you post a link to your site on Facebook.
DELETION HISTORY
This area details all the deletion records broken out by module in a monthly format. While you cannot recover the deleted records, there is a time and date stamp of the admin who deleted the records.
- Select the month and year.
- Hit Get Report.
- Click on the hyperlink for the module of interest.
HOME PAGE ITEMS
The Home Page Items area allows you to control the number of news, calendar, home page banners, etc. display on your home page.
- Calendar Items - Controls the number of Upcoming Events that display on the home page.
- Calendar Location Specific Events - Select "Yes" if you would like your school home pages to only display school calendar events. Events set to All Locations would only display on the full calendar. This is only available if you have multiple schools or locations.
- News Items - Controls the number of News items that display on the home page.
- Spotlights - Controls the number of Spotlight stories that display on the home page.
- Banner Items - Controls the number of home page banners that display on the home page.
- News Placement - Provides flexibility to move the news module so it displays in a different column. This feature is only available on newer templates.
- Calendar Placement - Provides flexibility to move the Upcoming Events so it displays in a different column. This feature is only available on newer templates.
- Header Fonts - Controls the font used for the header titles (News, Upcoming Events, etc.). This feature is only available on newer templates.
- Weather Info - Adds a weather widget to the home page.
PUBLIC WEBSITE FEATURES
The public website features video gives an overview of what visitors will see when viewing the website.
Website RSS is available (newinfo.cfm) and pulls in pages, news, calendar, filing cabinet and job posting updates. The updates only show if they will be happening within the next 30 days. Also, updates are pulled to the newinfo.cfm page every six hours. That would be around 6 am, noon, 6 pm and midnight. If a site admin makes an update at 8 am, it will not appear until noon. Contact support to activate.
SEARCH STATISTICS
This area details the information that has been searched on your website and breaks it down by month and year. Visitors enter in a keyword via the Search field on the front end of the site.
This information will be helpful in making sure the most frequented areas are easily accessible to your visitors either by a Quick Link, news item or main nav button.
SITE-WIDE CHANGES
This area allows a Webmaster the ability to see what changes to Site Content, News, Calendar and filing Cabinet have been made as well as who made the changes and when. There is also an option to view the changes and edit them, if necessary.
Content History Changes
Lost content can be recovered in this area by clicking on the Content History Changes link. To search for a page, click in the Search by Title field (top left corner) and type in the page name or part of the page name. Click on the view link next the page needing recovery, select the two page versions you wish to compare and click on Compare. The page differences will be highlighted in yellow. To overwrite the current content with saved content, select the checkbox Overwrite Current Content With This Saved Content and hit Overwrite. If you know the page version you wish to look at, choose the version by clicking on the details link and select the checkbox Overwrite Current Content With This Saved Content and hit Overwrite. If you know the subpage ID number or page title, you can easily search for the page via the Find by ID search box located at the bottom of the page.
Please note: the system will only recover content, not files or links added to the previous version.
To view content changes that a specific Admin made, use the Search by Person drop down to select the admin.
TeacherSites
This area details the site content, calendar, booklist, web links and poll updates teachers have made to their classroom sites. Choose the Today or Month, year and module, hit Show. You can select a specific teacher via the All Websites drop down menu.
« Show Help Categories | Print Entire Help Contents